Sign up for the Family Tree Newsletter Plus, you’ll receive our 10 Essential Genealogy Research Forms PDF as a special thank you!
Get Your Free Genealogy Forms
"*" indicates required fields
Several years ago, FamilySearch set an extraordinarily ambitious goal: to create an online family tree of the entire human race, at least since record-keeping began. After years of refinement, the FamilySearch Family Tree has become the largest collaborative family tree and the best tool for sharing and preserving your family history. And it’s completely free.
FamilySearch, the genealogy arm of the Church of Jesus Christ of Latter-day Saints (also known as the Mormon church), began this project by combining user-submitted family trees with information from historical records. The trees came from church members and the public; the records came from FamilySearch’s worldwide microfilming program. Today, the Family Tree has well over a billion names and nearly 20 million photos.
How to Use the FamilySearch Family Tree
The FamilySearch tree differs fundamentally from other large online family trees, such as those on Ancestry.com and MyHeritage. The FamilySearch Family Tree consists not of individually owned trees, but of a single tree that site users collaborate to build. The goal is to have a single profile for each person, avoiding the duplication on other sites.
Any registered FamilySearch user can add names, attach photos and stories, and make corrections. Just like Wikipedia, the online encyclopedia anyone can edit, the FamilySearch Family Tree relies on crowdsourcing to grow and improve. There are other collaborative online family trees, such as Geni, WeRelate and WikiTree, but they’re much smaller and less polished than the FamilySearch Family Tree.
You even could use the FamilySearch Family Tree as your primary research-organizing tool, instead of genealogy software. The Family Tree has all the key features of desktop programs and keeps information on living people private. You can view and edit the tree with the free mobile apps FamilySearch Tree and Memories, available in the site’s App Gallery. Since it’s online, you don’t need to worry about backing up your data to the web. But you do need to be comfortable with the fact that other people can edit your relatives’ profiles in the Family Tree.
After several years using the FamilySearch Family Tree, I’ve discovered some helpful tricks for making the most of this impressive genealogy research tool. Give these tricks a try when building your forever family tree.
1. Register for free
You must have a free registration with FamilySearch to use the Family Tree and to search the site’s historical records. Start by clicking Free Account at the top right of the home page. To speed up your sign-in on future visits, allow your web browser or mobile device to remember your login information.
2. Get started in the tree
Get started in the tree. Log in to FamilySearch and click on the Family Tree tab to get started building your tree or view what you have so far. The first time you log in to the Family Tree, select the option to Start Here. You’ll be prompted to enter your name and date and place of birth. In Tree view (you can opt for landscape, portrait or descendancy), click on Add Husband, Add Wife or Add Child to add a new relative. That will open a box to add the selected relative. Fill in as much information as you can and click Next.

Now, FamilySearch’s efforts to prevent duplicate profiles kick in. If your relative is deceased, a list will show you profiles of people already in the tree who match what you’ve entered about your relative. If you find a correct match, click Add Match. Otherwise, select Refine Search to enter or change search terms, or Create Person to add a new profile to the Family Tree.
3. Add unconnected people
Usually, you’ll add parents, siblings or children to people already in the Family Tree. But to add a new, unconnected person to the tree, click on Recents and select Add Unconnected Person.
4. Add relatives
When you reach an “end-of-line” ancestor, you can click on Add Husband or Add Wife to add a parent. To add a child to a couple, click on Children and select Add Child.
5. Find research clues
To search the tree for information others have added about your deceased relatives, you can either select Find from the Family Tree menu, or Family Tree from the Search menu.
6. Keep living people private
The Family Tree shows you information about a living person only if you added that person to the tree. A person is considered living if he or she lacks death information and was born 110 or fewer years ago, married 95 or fewer years ago, or has a child born 95 or fewer years ago.
7. Mine other FamilySearch resources
Remember, the Family Tree search is separate from other resources on FamilySearch. In fact, the site’s Search menu has six options (Records, Family Tree, Genealogies, Catalog, Books and Research Wiki), and you have to search each one separately. Genealogies is a separate collection of family tree data, distinct from the Family Tree.
8. Navigate the tree
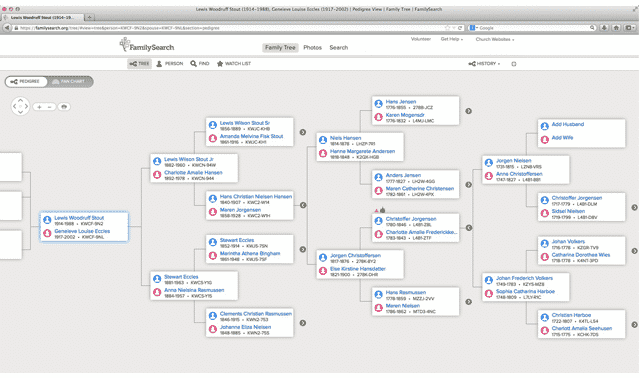
To display one of four layouts—landscape, portrait, fan chart or descendancy—go to the site’s Family Tree menu and select Tree. Move the tree by clicking and dragging the page, as you would a Google Map). Click on the plus or minus sign to zoom in or out. Select Options to choose items to display in the tree and to change the background. Click on Children to view a couple’s children. To expand or collapse a branch of the tree, click on a left or right arrow.
9. View personal info
In any tree view, you can see a person’s Summary Card of basic information by clicking on his name. From there, you can move the person to the root position in the tree or jump to her Person page, which has more detail.
10. Get notifications
The top of a Person page shows the person’s name, FamilySearch Family Tree ID, and dates of birth and death, plus three links: View Tree, Watch, and View My Relationship. Click on Watch to get email notifications when anyone changes this record. (To see lists of people you’re watching and recent changes to their Family Tree records, go to the lower menu at the top of any page in Family Tree and then click on Lists.) Click on View My Relationship to display a chart showing how you and the selected person descend from a shared ancestor.
11. Edit your relatives
You can edit any deceased person in the tree, as well as any living person you added. On a Person page, look under the Details tab and click on any information to edit it. Click on the pencil icon to edit a relationship and on the plus sign to add a parent, child, spouse or sibling. Under Other Information, you can add facts, such as occupation, religious affiliation and physical description. Enter biographical information in the Life Sketch section.
12. Cite sources
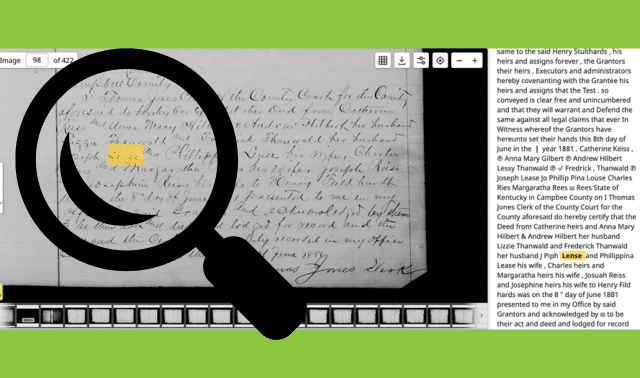
When you add or edit information in the Family Tree, it’s important to record your sources. Citations to sources, such as birth certificates, family Bible records and wills, acknowledge research done by others and help users verify the information, assess its reliability and double-check the sources for more details.
Start on a Person page in the Sources panel. Click on Open Details to view existing sources, or on Add Source to create a new one. The Add Source form has a space for the source title (such as a book title or the name of an online record collection) and a link to a web page or a “memory,” such as a historic record. You can either upload a record or select a document already in a gallery in the Family Tree. You also can add a citation, notes, the reason you attached the source, and the fact (name, sex, birth, christening, death and/or burial) that this source supports.
13. Re-use an already-cited source
When you’re creating a source that you’ll re-use for other records, leave the checkmark in the box to “Add Source to My Source Box.” Then, when you cite the same source again, instead of selecting Add Source and retyping the citation, you can save time by selecting Attach from Source Box. You can view your Source Box at any time by clicking on your name in the upper right corner, then choosing Source Box.
14. Support your case for corrections
When you edit information about a person in the tree, you won’t see the separate spaces for a source title, a citation, notes and a link to the record. Instead, you’re given a single box to provide the “reason this information is correct.” You might include a source citation here. At the least, provide a link to a source along with enough detail so someone else could find it and determine if it’s reliable.
15. Add notes
The Person page has panels for Discussions and Notes. Under Discussions, you can communicate with other researchers and request additional information on common ancestors. You might use Notes to comment on a source’s reliability, and on contradictory or incorrect information.
16. Get research hints
FamilySearch automatically searches its historical record collections and Find A Grave for matches to people in the Family Tree. It alerts you to finds with icons in the Research Help section on a Person page and in tree view:
- A blue icon indicates hints—records that likely pertain to the person.
- A purple icon provides research suggestions, usually indicating that no source citations are attached to the person’s profile.
- A red icon identifies data problems, such as someone not born until after he was married or a nonstandard place name.
Click on an icon to see the details. If you agree that a hint leads to a record about the right person, it’s easy to attach the record to the person’s profile in the Family Tree. This is a handy way to find new information in FamilySearch’s growing record collections.
17. Search major genealogy sites
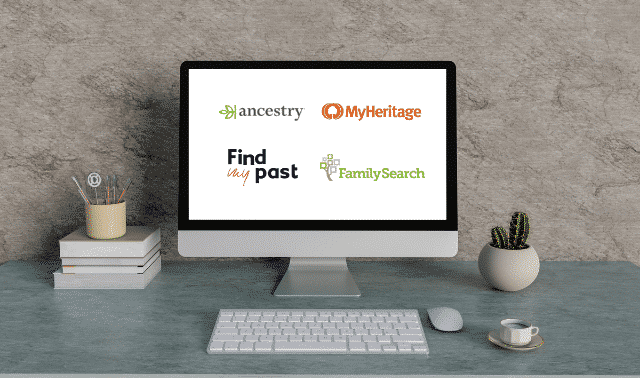
You can search the four largest genealogy websites from a Person page. In the Search Records panel, click on FamilySearch, Ancestry, Findmypast or MyHeritage to display the results. (This is a time-saver, but you’ll still want to try other search terms and to search individual databases on these sites.) Just click to attach matching records from FamilySearch or MyHeritage. For the other sites, you’ll need to manually enter the data in the Family Tree.
18. Create reports, merge and more
Three more panels on the Person page provide additional useful functions:
- Print: Create reports and charts, and print or save them as PDFs.
- Latest Changes: View a history of changes made to a person’s record. Click on the author of a change to see the user’s contact information and send a message. (When you’re logged in to FamilySearch, there’s a link to your messages in the upper right corner of the screen.)
- Tools: Click on Possible Duplicates in this panel to find and merge matching people.
19. Customize the Person page
Let’s say you’d like to move the Family Members panel to the top of the page and the Life Sketches panel to the bottom. Click on the gear icon at the upper right. Bars then appear on the upper right of each panel on the page, and you can drag and drop the panels where you want them. When you’re done rearranging the panels, click on the gear icon again. The new layout will apply to all Person pages you view.
20. Sync your software
Three desktop software programs—Ancestral Quest 15, Legacy Family Tree 9 and RootsMagic 7 with TreeShare—all sync with the FamilySearch Family Tree. They let you copy information both ways, from your genealogy software to the Family Tree and vice versa. This lets you save time updating the Family Tree with information from your software. And the Family Tree might have new details, such as a more complete name or additional life events, you can add to your software.
Consult your software help info for syncing instructions. In the RootsMagic File menu, for example, select FamilySearch Central to find matches between your file and the Family Tree and to share data between them. You can add or correct names, relationships, events, media, notes and sources, as well as merge duplicate profiles, in the Family Tree. You might also capture new sources, notes and media to add to your RootsMagic file.
21. Transfer data via GEDCOM
If your genealogy software program doesn’t sync with the FamilySearch Family Tree, you can use a GEDCOM to copy information to the tree. First, follow your genealogy software manufacturer’s instructions to generate a GEDCOM file, a standard file format that all genealogy programs can read. Then log in to FamilySearch and select Genealogies from the Search menu, scroll down and click on Submit Tree. Choose the GEDCOM file from your computer. Your file will be added to the Pedigree Research File on the FamilySearch site, which you can search by selecting Search>Genealogies.
Prompts will help you compare your uploaded file to records in the Family Tree to find connected people who are new or have more accurate information than you do. Then you can copy the new information into the Family Tree. But any notes, sources or image links in your GEDCOM file won’t be added to the Family Tree. Given these limitations, syncing (as described in tip No. 20) might be the way to go, if possible.
22. Import Family Tree data into RootsMagic
You can import a person’s ancestors or descendants from the FamilySearch tree into a RootsMagic file on your computer. I recommend importing the data into a new RootsMagic file first, before merging it with your main file. In RootsMagic, select File>FamilySearch Central, click on Import, specify the start person, and choose how many generations of ancestors and descendants to import. RootsMagic imports only birth, christening, death and burial facts. You need to import other facts, as well as sources, notes, photos and documents, individually.
23. Organize and share “Memories”
FamilySearch has an excellent system for organizing and sharing photographs, documents, stories and audio files. You can attach them as “Memories” to people in the tree, and see those other users have added. For the item to be public, though, all the individuals tagged in the memory must be deceased. But you can share a memory tagged or attached to a living person via social media or emailed link.

24. Manage your Memories
Under the Memories tab, select Gallery to view your Memories. Click on the plus sign in a green circle to add more by dragging and dropping files or selecting them from your hard drive. You can add digital images in JPG, TIF, BMP or PNG format; documents in PDF format; and audio files in MP3, M4A and WAV format. The file size can’t exceed 15MB. You can’t add video files.
25. Add Memories and Stories to a person
On a Person page, click the Memories tab to view the person’s Memories. You can add more here by uploading files or selecting from the Gallery. Click on Create Story to add a narrative and upload a photo to go with it.
26. Tag and attach Memories
After you’ve uploaded a memory, left-click on it (just click on a Mac) to add a title and other information. For uploaded photos, click the face to tag a person. For a document, type the name in the box that says, “Who is in this memory?” Then select from the suggested matches already in the Family Tree.
If no match is found, you can search for the person by clicking on Add New, then on Attach to Family Tree in the People panel on the right. If you still don’t find the person in the tree, you’ll have to click on the Family Tree tab and create a new person linked to someone already in the tree, or select Add Unconnected Person from the Recents menu. Then go back to the image and tag the person.
27. See others attached to a memory
When you view a photo or document, the people in it are listed in the People panel on the right. Click on a name to open the person’s Summary Card with links to his Person page and family tree.
28. Add info to Memories
When viewing an image or document file, you can add a title above it and a date, place and description in the Details panel on the right. You can also add stories for image files. (According to FamilySearch, these titles and descriptions may help Google and other search engines find media items, but I’ve never seen Memories show up in Google search results.) Click on Actions to rotate or download an image, or to add an image or a document to an album.
29. See who has Memories
Select People from the Memories tab to see your relatives with attached Memories. Click on a person’s memory card to open the Memories tab on their Person page.
30. Add a relative’s profile picture
The preferred portrait appears as a small photo on the Person page and Summary Card. You can change the preferred portrait on the Person page: Click on the portrait in the upper left and select a different one.
31. Search all Memories
Typically, you’ll focus on Memories linked to your relatives, but you can keyword-search all FamilySearch Memories. This might lead you to information about your ancestors’ neighborhood or employer, for example. Select Find from the Memories menu and enter your search term, such as a place. This page searches the title, description and text of Memories. It doesn’t search people’s names, unless they’re in a memory’s title or description.
32. Create albums
You can organize your Memories into albums and put a memory into multiple albums. I have eight albums, one for each great-grandparent’s branch of the family. Under the Memories tab, select Gallery to see links to all your albums on the left. I really like the large photo thumbnails and how they’re linked to even larger images and to personal profiles in the Family Tree.
33. Share Memories with relatives
This is easy and, I think, one of FamilySearch’s best features. When viewing an individual memory, click on Share to share it via social media or email, or to copy a link to the file to paste into an email message or onto a website. To share an album in the same way, select Gallery from the Memories tab and click on an album name on the left. It’s useful to be able to share a link to an album with my key photos and records from one branch of my family. My albums include unidentified photos I believe are from that branch, in hopes that somebody recognizes a face.
34. Make a family history booklet
From the Family Tree menu, select Family Booklet. Follow the steps to add family information and photos to a booklet that you can save as a PDF file.
A version of this article appeared in the March/April 2018 issue of Family Tree Magazine.
Related Reads


ADVERTISEMENT
Author
A contributing editor for Family Tree Magazine, Rick Crume specializes in online research, genealogy software, DNA testing and British genealogy.