Sign up for the Family Tree Newsletter Plus, you’ll receive our 10 Essential Genealogy Research Forms PDF as a special thank you!
Get Your Free Genealogy Forms
"*" indicates required fields

As you discover your family history, it’s important to record where you find each piece of information. Let’s say you’ve found conflicting records with your grandfather’s date and place of birth. The date he celebrated his birthday doesn’t match what’s in the family Bible, and the place where he said he was born doesn’t match what his birth certificate says. If you keep track of all those sources, you’ll be able to find and compare them and maybe even determine which one is the most reliable. Later on, if you share your family history in writing, you’ll be able to include footnotes that provide evidence for your claims, and give credit to those whose works you consulted. Relatives will know they can depend on your research and build on what you’ve done without having to repeat it. Most of all, you’ll be confident that you’ve gotten as close as you can to the truth about your family history.
Source citations have an intimidating reputation as difficult to write and impossible to organize. Fortunately, genealogy software helps you do both. Most programs let you describe the birth certificates, census records, personal interviews and other sources you have for births, marriages, deaths and other facts. You can link these descriptions to their corresponding facts and create reports with correctly formatted footnotes or endnotes. You also can include your source citations when you submit your family file to an online family tree database. If you share your file with relatives who use genealogy software, they won’t need to re-enter all your sources.
We’ll show you how the current versions of three popular desktop genealogy programs—Family Tree Maker, Legacy Family Tree and RootsMagic—can turn the sometimes-scary task of source citation into a satisfying one instead.
Source Citation Basics
Genealogists use a lot of specialized sources, such as family Bibles, microfilmed church records and online census records. What a source citation looks like varies with the type of record, but in general, a source citation has four parts: author, title, publisher (including place and year) and locator (usually a page number or certificate number). If the source is online, such as an Ancestry.com collection or a Google book, you should cite the original work (often a book, microfilm or manuscript), as well as the website’s title and URL, and the date you found the information you’re citing.
Database descriptions on Ancestry.com, FamilySearch.org and other genealogy websites usually state the source of the data, but these bibliographic references are often not written in a consistent format—or one that follows accepted genealogical citation standards. Those standards are set forth in two books by Elizabeth Shown Mills, both from Genealogical Publishing Co.: Evidence! Citation & Analysis for the Family Historian and Evidence Explained: Citing History Sources from Artifacts to Cyberspace, 2nd edition.
Family Tree Maker, Legacy Family Tree and RootsMagic all use Evidence Explained as a guide for creating source citations. Genealogy software lets you attach a source citation to just about every “fact”—a name, place or life event—in your tree. Most of your source citations will be linked to events, such as births, marriages and deaths, but as you’ll see, some might be linked to a person or a family. You also can quote from the source, comment on it, attach a scanned copy of it and rate its reliability.
In most programs, you’ll create citations in two steps. First you add a source. Templates let you create different types of sources, so it’s mostly a matter of filling in the blanks. Select a template for the appropriate source type and fill in each field for author, title, publisher, repository (where you found the source), etc. Once you create a source, you can save it and use it to cite other information you’ve found in that source. So you might have one “master source” (such as the Cincinnati Birth and Death Records, 1865-1912 database) with multiple citations from that source (if you’ve found birth and death records for many relatives in the aforementioned database).
As you enter source citation information, your genealogy software automatically formats it to create three types of references used in written family histories and reports:
- Bibliographic entry: Also called a source list entry, this is information about the source itself, such as a book or online database. You’d include it in a bibliography of sources accompanying your family history book or report.
- Footnote/endnote: This full reference note includes information about the source, plus a locator for the specific information you found in it (such as birthdate or occupation). It serves as a numbered footnote or endnote in your family history or report.
- Short footnote or subsequent citation: If you refer to the same source multiple times in a report, you don’t have to use a full footnote or endnote citation each time. Instead, for the second and later references, use this short form of the full reference note. It includes a locator for the specific information found, plus abbreviated source information.
Family Tree Maker 2019
With MacKiev’s best-selling Family Tree Maker software, you can create a source citation starting from either Tree view or Person view in Family Tree Maker 2019.
In Tree view, look in the right panel, where you see facts about the person whose profile is highlighted. Each fact with a source citation has a source icon (it looks like a quill pen writing on paper) to its right; click to add a new source. Facts without source citations have no icon. Mouse over the fact and a source citation icon with a plus sign appears. Click on it to add a citation for that fact.
From Person view, click on a fact about the person in the center panel, and you’ll see all the sources for that fact in the detail panel on the right. To add a new citation or use an existing source with a different citation, click on New and choose Add New Source Citation.
How to Create a Source Citation Using Family Tree Maker 2019
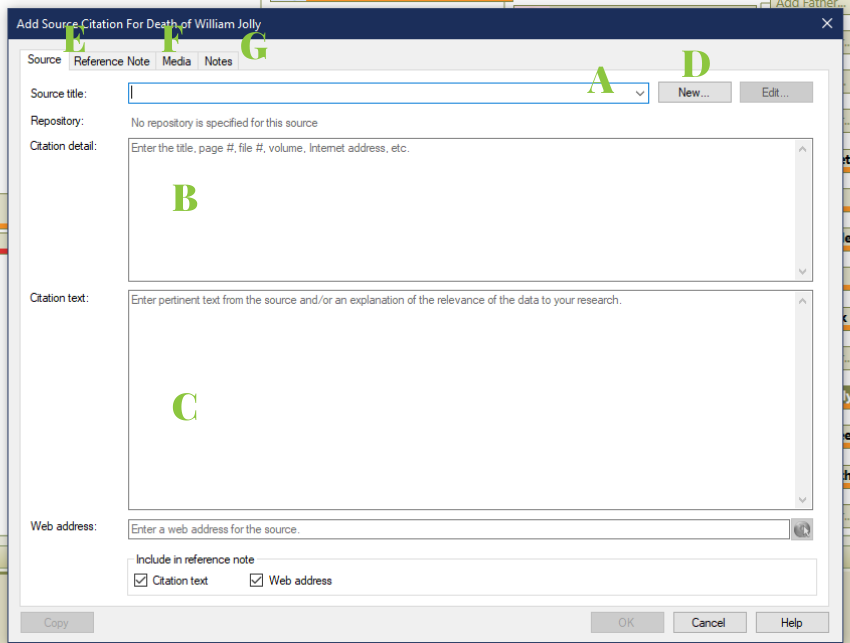
In the Add Source Citation window, use the down arrow in the Source title field [A] to choose a source you’ve already cited (or begin typing the title of the source you’re looking for in the field). Or, to edit the source, click the Change button. Then add new source details. In the Citation Detail field [B], you could add the page number of a book or a census enumeration district and page number. In the Citation Text field [C], add transcribed information from the book or census record.
If you haven’t already used the source you want to cite, you can click the New button [D] in the Add Source Citation window. This brings up the Add Source window, where you can search for a template for the kind of source you’re citing by entering a word such as birth or death in the Source template field. To browse source templates arranged in categories, click the More button. Begin by selecting one of a dozen broad source groups, such as Census Records, before working your way down through Categories and specific source types. For instance, to document an online census image, select the Census Records source group, which leads to several categories: Original Manuscripts, Digital Images, Microfilm and Derivatives. Select Digital Images and then a template; for an online census collection, you might choose Online Commercial Site—Generic (by Census Year).
Family Tree Maker has fewer source templates than Legacy and RootsMagic. For instance, I can’t find templates for passenger lists or Canadian census records. If you can’t find a template for a particular source type, use a generic template, such as Database Online—Generic (any country; any online database). Alternatively, you can leave the template field blank and use the generic default template.
Clicking OK in the Add Source window opens the Add Source Citation window, where you can enter details for this citation, including a description, text from the citation (such as a grave marker inscription) and a web address (if applicable). Popup instructions prompt you on the type of information to add. The window has three other tabs: Reference Note [E] shows how the citation will appear as an endnote in a report. Click inside the text box and you can select text to italicize or underline. Select the Media tab [F] to attach an image of the source, such as a digitized passenger list page. Use the Notes tab [G] to add comments to the source citation.
Family Tree Maker’s Sources workspace, which you can access by clicking the Sources link in the navigation bar at the top of the screen, lets you manage your sources and see how they’re used in your tree. For example, click on a source under Source Groups on the left, and a list of citations based on that source will appear in the center of the screen. If you click on one of those citations, the panel below will show you each person and fact that source citation is linked to. On the right, you’ll see citation detail and text, as well as the reference note, for the highlighted source citation, and you can click to edit the citation or source. The Edit Source window lets you add a Source Repository, such as a library where you consulted a printed city directory or a website where you found a census database.
Quick Tips
Family Tree Maker has ways to speed up citing the same source multiple times, such as when you find several members of a family in the same household in a census. To cite a source for the first person, highlight the census fact, look under the Sources tab and, in the right panel, select New > Add New Source Citation. When you’re done, go to the next person in the household, create a census fact, highlight it and on the right, select New > Use Existing Source Citation. That opens up the Find Source Citation window with the last citation you used highlighted.
Select Link to Citation to use the same page number or pick Create New Copy to cite a different page number.
Here’s another way to quickly link a source citation to facts for a series of people: Click on the Sources tab and select a citation. Under the Links tab, click on New. Then select a fact for another person and click OK.
You also can copy and paste a source citation. Select a fact in Facts or Timeline view, then select a source linked to it. Click on the Copy Source Citation icon (it looks like two duplicate pages). Then highlight another fact associated with the same person or someone else. Under the Sources tab, click the down arrow beside New. Select Paste Link to Source Citation to use the same page number or Duplicate Source Citation to enter a different page number.
You can search Ancestry.com for someone in your Family Tree Maker file and incorporate matching records into your tree. Family Tree Maker links the source information to each fact, but the source citations often lack key information or aren’t formatted properly. For example, if you merge information from a Public Member Tree, the source citation references Ancestry.com, as it should, but not the tree’s owner. So it’s usually worthwhile to create your own source citation, rather than using the one Ancestry.com generates automatically.
Legacy Family Tree 9.0
Legacy software guides you through a simple step-by-step process to create source citations using an extensive set of more than 1,200 source templates for the United States and other countries. A SourceWriter guides you through the whole process.
How to Create a Source Citation Using Legacy Software
Start by double-clicking on a name in Family or Pedigree view to open the Individual’s Information window. To link a source citation to an event, click on the source citation column (the one headed by a books icon) in the row for that event. (A books icon in that square indicates that at least one source citation is already attached to the event.) This opens the person’s Assigned Sources window, which shows all the sources assigned to the person and the person’s events. The event you selected is highlighted. To cite an existing source, click Cite a Master Source. To cite a new source, click Add a New Source, which opens the SourceWriter.
When creating a new Master Source, the SourceWriter starts by asking you a series of questions so it can select the best source template. You can either enter a general source type, such as census, to find matching templates, or choose a general source type from the list. If you select Census Records, you’re prompted for a country. Select the United States and you’re asked to select the type of census record. Choose Federal Census Records and then you can select a year between 1790 and 1940. Finally, you’ll select a medium—microfilm/fiche or online images. Then click Go to Step 2.
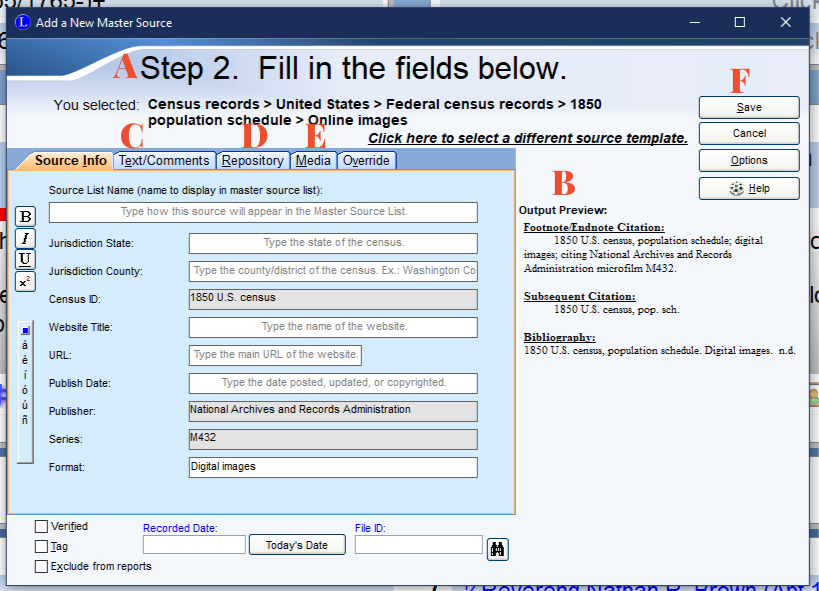
Step 2 opens the template for the source type you selected [A]. Some fields may already be populated. For example, for online images of the 1920 census, the template is already filled in with “1920 US census,” the publisher (National Archives and Records Administration), the microfilm series (T625) and the format (Digital images). Just fill in the remaining blanks with the information specified, such as the state, county, website name and URL. On the right, you can see a preview of the footnote or endnote citation, the subsequent citation and the bibliographic reference [B].
Step 2 also has tabs where you can add a quotation from the source and comments on it [C], the repository where you found it [D] and digital files [E]. These are meant to apply to the Master Source, not to the specific information you’re citing. When you’re finished, click the Save button [F].
In Step 3, you’ll add source details. Just fill in the blanks for each field, such as city and page number. The File ID field is optional; you can use it to reference a document number you might write on paper files. Use the tabs here to add a quotation, comments or uploaded media (such as an image of a census page) that pertain to this specific citation.
Quick Tips
Once you’ve created an event and attached a source citation to it, you can easily copy and paste the event and citation at the same time, a real timesaver. Let’s say you found a family in a census record and you want to add the same census event and source citation to each person in the family. Create a census fact for one person and attach a source citation to it. In the Individual’s Information window, click on the census event to select it and hit the Edit button. In the Edit Event window, click on the two-page icon on the right to copy both the event and the citation to the Clipboard. Now open the Individual’s Information window for another member of the family who appears in the same census record. In the Events/Facts section, click on the Add button and then click on the button in the lower right corner to paste the event and citation from the clipboard. Hit the Save button and move on to the next person in the family.
You can store citations in up to 10 Source Clipboards for handy access. Each Clipboard can hold up to five citations, all of which can be pasted at once. You could put sources you use often (such as census records) or that you’re working on currently, in clipboards. Or organize sources in clipboards by family or source type.
If you have a source that provides general information on a person, you can create an individual or person source. For example, if an obituary or a biography in a county history provides details pertaining to a person’s birth, marriage and death, you could link the citation to the person, rather than separately to the person’s birth, marriage and death events. (Family Tree Maker doesn’t support individual sources. When importing individual sources from another program, Family Tree Maker converts them to name sources.)
RootsMagic 7
RootsMagic makes it easy to create source citations using a huge collection of source templates for the United States and other countries. The program’s Citation Manager helps you add, edit, copy and delete source citations. To access it, open a person’s Edit Person window, highlight a name or a fact, then click on either the Sources button in the edit pane on the right (it looks like a certificate) or the Sources column (headed by a picture of a certificate) in the same row as the name or a fact you’re working with.
Here’s another way: Highlight a name in any navigation view and click the Edit Sources icon (it also looks like a certificate) in the toolbar at the top of the screen. Then select Person for general individual sources, Family for family sources or Source List to see a list of all master sources.
How to Create a Source Citation Using RootsMagic
First, click the Add New Source button in the Citation Manager. That opens the Select Source Type window where you can browse the list of types. When you highlight a source type, the right window shows a description of it and the page number where it’s discussed in Evidence Explained. Use the three buttons at the top of the window to speed up the process: Highlight a source type you use frequently and click on the star button to make it a favorite. Use the Favorites button to access favorite source types or the Recent button to select a recently used source type.
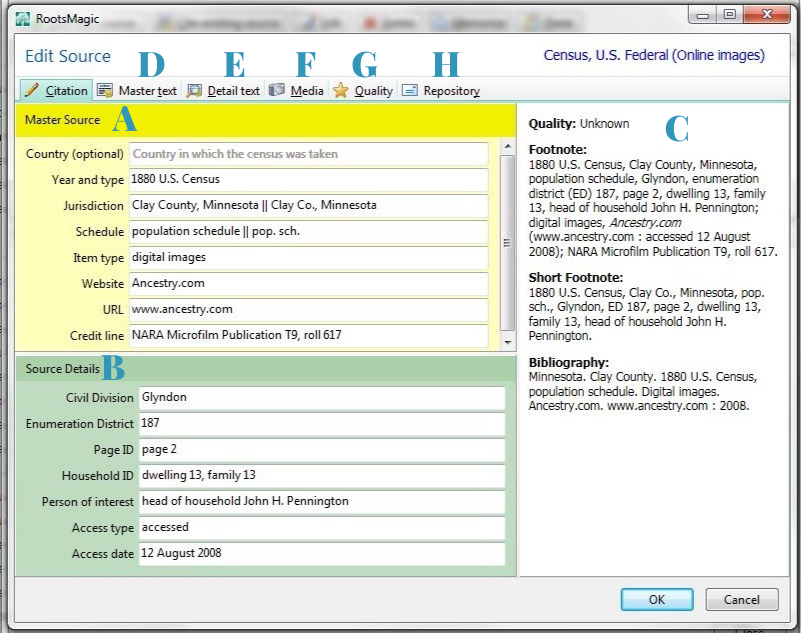
When you select a source type, the Edit Source window opens up with several tabs. The Citation tab has three sections: The yellow section at the top has fields for entering Master Source information [A], the green section at the bottom has the Source Details fields [B], and the right section displays a preview of the reference as a footnote, a short (or subsequent) footnote and a bibliographic entry [C]. Just fill in the blanks to create or edit the source. It’s convenient to be able to view the Master Source while you add source details.
The Edit Source window has several other tabs: Master Text [D] holds a quote and comments that apply to the source in general. Anything you put here appears with all citations to this source. The Detail Text tab [E] holds text and comments that pertain to this specific citation. The Media tab [F] lets you attach digital files (document images, photos or audio or video) to the source and citation. Quality [G] lets you rate the source’s reliability, and Repository [H] lets you record where you found the source, such as an archive or website.
Quick Tips
Once you create a source citation, you can quickly copy and paste it to another person, family or fact. For instance, when you find family members listed together on a census record, create a census fact linked to a source citation for one member of the family. Highlight the source citation in the Citation Manager and click the Memorize button
Then add the same census fact to each of the other members of the family who appear on the same census record. One by one, highlight each new fact, click the Sources button and hit the Paste button to copy the source citation.
If you have a source that applies to a whole family, such as a census household listing, you can create a family source in RootsMagic. In the Edit Person window, highlight a spouse and click in the sources column. When importing family sources from another program, Family Tree Maker and Legacy Family Tree convert them to marriage sources.
Like Legacy Family Tree, RootsMagic lets you create an individual or person source: In the Edit Person window, highlight the person’s name and click in the sources column. As noted, Family Tree Maker converts individual sources to name sources when importing files from other programs. RootsMagic doesn’t support name sources and converts them to individual sources when importing.
From the May/June 2015 Family Tree Magazine


FamilyTreeMagazine.com is a participant in affiliate programs through Amazon and Genealogical Publishing Co. It provides a means for this site to earn advertising fees, by advertising and linking to affiliated websites.
ADVERTISEMENT
Author
A contributing editor for Family Tree Magazine, Rick Crume specializes in online research, genealogy software, DNA testing and British genealogy.