Sign up for the Family Tree Newsletter Plus, you’ll receive our 10 Essential Genealogy Research Forms PDF as a special thank you!
Get Your Free Genealogy Forms
"*" indicates required fields
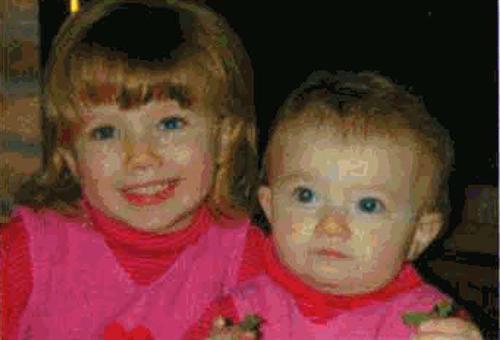
Our present-day family photos usually aren’t flawless, either. For example, although you may affectionately refer to your kids or grandkids as “cute little devils,” you don’t want them sporting demonic red eyes in your photos.
Red eye occurs when your camera’s flash reflects off your subjects’ retinas. The low light that necessitates the flash also makes Kelsey’s and Tommy’s pupils open wider — which aggravates the problem.
Fortunately, your image-editing software can bring back their baby blues (or greens or browns) in a flash. It’s usually as simple as using the now-common automatic red-eye remover. Although the process varies from program to program, the aim is the same: Replace the red pixels with black for the pupil, and restore color to the iris.
Here’s how to use Paint Shop Pro to get the red out:
1. Select Red Eye Removal on the Adjust menu.
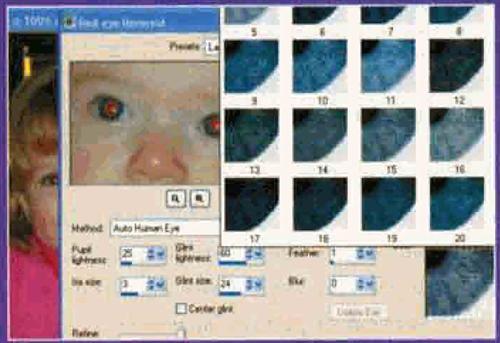
3. Select Auto Human Eye on the pull-down menu (Eye-Color Options, below).
4. Check the Center Glint box to add that little sparkle of white in the center of the eye.
5. Zoom in on a pupil.

7. Preview the results in the window on the right.
8. If you didn’t center the pupil perfectly, just move it around until you’re happy with its appearance in the preview window.
1. Blow up the picture so you can clearly see the pupil.
2. Use the Lasso tool (which selects an image area) to draw a circle just inside the red pupil — stay within a pixel or two of the edge.
3. Go to the Selection menu and Feather the edge by several pixels. You may need to adjust the feathering a few times to achieve the best effect.
4. Hide the edges of the selection area — they’ll be distracting as you try to judge the success of the effect.
5. Darken the pupil. The easiest way is to go to the Curves menu and drag the right-side point to the bottom, making everything black. But that can end up unnaturally black.
Another solution: In the Saturation menu, reduce the saturation of the red eye to 10 to 12 percent. Then, on the same menu, use the brightness slider to darken the pupil almost — but not quite — to black. (Try to match the darkest shadow detail in the photo.) This technique also minimizes scattered red light outside the pupil.
6. Whatever your method, always zoom out to look at the overall effect. Retouching around the eyes can go bad quickly and unexpectedly. Expect to redo it a few times to get the best results.
From the April 2004 Family Tree Magazine
ADVERTISEMENT
