So how do you identify that mystery baby in your great-grand mother’s photo album? Solving a picture puzzle requires not only knowledge of family history, but also the ability to recognize and interpret identifying clues, such as the subjects’ clothing and hairstyles, the type of photograph and the photographer’s imprint. Some of these clues will help you date the image, while others will add color to the photograph’s story. It’s not always possible to identify each person — there may be missing genealogical information or insufficient photographic evidence — but you won’t know that until you start examining your pictures.
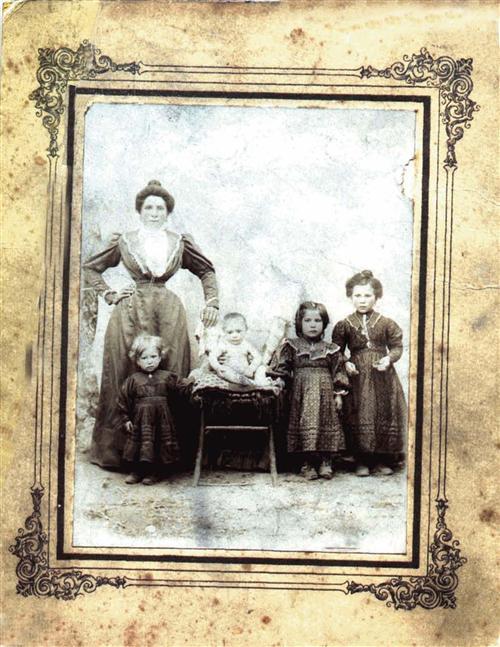
The first thing I do upon receiving a reader’s photograph (such as this one from Barbara DiMunno) is to carefully study it for details. With your own photographs, you may have trouble “seeing” the clues because you’ve looked at them so many times. So your first step is to pretend you’ve never looked at them before. Use a magnifying glass or scanner to enlarge sections of your photos. Then, start on one side of each picture and methodically move across the image, carefully examining each person from head to toe, as well as the background. Take note of every detail, and remember that you won’t add up all the clues until you’ve finished your research. Keep an eye out for these five cities I look for when analyzing an old photograph:
1. Type of photograph
Different types of photographs were popular at different times. For example, the earliest types of photos — shiny metal daguerreotypes (1839 to 1860), glass ambrotypes (1854 to 1860s) and iron tintypes (1856 to mid 1900s) — all debuted in the mid-19th century, but only the tintype stayed popular into the 20th century. Then, photographers switched to paper prints (1855 to the present). Determining the type of photograph can help narrow an image’s time frame. For help, consult Collector’s Guide to Early Photographs by O. Henry Mace (Krause Publications) or the September 2003 Preserving Your Memories, a special issue of Family Tree Magazine,
2. Photographer’s imprint
Many 19th-and early 20th-century photographers stamped their names and studio addresses on the hacks of their images. Using old city directories and directories of photographers working in specific regions — such as Biographies of Western Photographers by Carl Mautz (Carl Mautz Publishing) or Photographers: A Sourcebook for Historical Research edited by Peter E. Palmquist (Carl Mautz Publishing) — you can determine when the photographer operated his studio. That will help you narrow the image’s time frame even further.
3. Setting
While the setting won’t necessarily help to date your image, it might provide some interesting clues about your ancestors’ lives. For example, look closely at DiMunno’s picture. At the left edge of the portrait, you’ll notice the edge of a photographer’s white backdrop near one of the mother’s elbows. The barely visible foliage and the dirt in the foreground indicate that the image was taken outdoors, probably by an itinerant photographer. The family may have lived in a rural area, where the photographer stopped to set up his portable studio.
4. Clothing and hairstyle
Unfortunately, DiMunno’s picture doesn’t have a photographer’s imprint, and the photo type (paper) doesn’t help to date the image, That means she must rely on costume clues to identify this family. When analysing your own photos for costume clues, consult a fashion encyclopedia such as Dressed for the Photographer: Ordinary Americans and Fashion, 1840-1900 by Joan Severa (Kent State University Press) for pictures of historical styles.
Focusing on the main figure in the photograph, the mother reveals several clues. Her stance — one hand on her hip and the other on the photographer’s chair — reflects a dominant personality. It also draws attention to her tiny waist, held in place by the restrictive corsets of the late 19th and early 20th centuries. The woman conformed to the fashion ideal of having a waist small enough for her husband’s hands to touch while encircling it. According to Support and Seduction: A History of Corsets and Bras by Beatrice Fontanel (Harry Abrams), these undergarments were popular from the 1870s through 1914. This fact provides a tentative time frame for the image.
John Peacock’s costume encyclopedia 20th Century Fashion (Thames and Hudson) indicates that the mother’s dress — with the deep V-neck opening, white high-necked shirt with full collar, and right lower sleeves with fullness at the upper arms — resembles dresses worn around 1906. This clothing information suggests the picture was taken between 1900 and 1910, Using a 10-year time frame allows for stylistic variations.
5. Genealogical data
Once you’ve narrowed the time frame for the image, can you identify the photograph’s subjects using genealogical data? Notice the infant in DiMunno’s picture. While the baby’s sex is unclear, finding genealogical records of a child born between 1900 and 1910 could identify the whole family.
The final step in photo identification is adding up all the clues to draw a conclusion. In DiMunno’s photo, the mother’s costume provides a time frame, hut DiMunno doesn’t have enough genealogical data to identify the family. Still, through observation, she now knows a lot more about this photograph. And as she continues to research, she’ll come closer to putting names to those faces.
Try applying these techniques to your own photographs, and see if you can uncover an interesting story to add to your family knowledge. Then, be sure to label your images, so your descendants don’t end up with the same boxes of unidentified photos.
From Family Tree Magazine‘s November 2003 Trace Your Family History.


