Wouldn’t it be great if a genealogy website could write your family stories for you? All those names and dates could magically turn into a narrative for your next book, or a video to post on social media. Maybe a likeness of your ancestor could even tell her own life story.
These ideas may sound far-fetched, but they’re already possible thanks to artificial intelligence (AI) and other advanced technologies. In fact, AI has been powering your website searches and record-hinting experiences for some time. Now, they can also help you string together the stories those records tell.
This shift toward storybuilding is deliberate. Industry leaders recognize that many of their customers are driven by a hunger for meaningful stories. And, knowing many genealogists are first drawn in by family stories, the megawebsites want to help new users discover stories and share them with others. Other companies want to convert DNA testers’ casual curiosity about their origins into a genuine passion for genealogy.
Of course, the stories can only be as good as the details you feed into them: names, dates, places, photos and so on. But once you get those details right, storybuilding tools help you organize, narrate and share your ancestral tales in easy yet compelling ways.
Let’s take a look at the best storybuilding tools at three of the genealogy giants—Ancestry.com, FamilySearch and MyHeritage—and how they can help you connect with the past and share your ancestors’ experiences.
Ancestry.com Story Tools
Ancestry.com subscribers can combine three especially powerful storybuilders: LifeStory, Stories (in the mobile app) and AncestryDNA Communities.
LifeStory
This tool, available in its own tab from an Ancestry.com tree profile, organizes data from the Facts section of family tree profiles into timelines. LifeStory begins with a short summary of the person’s life, autofilled from details added in your family tree. The timeline then shows documented life events, such as the births of a person’s siblings and children; migrations; military service; and residences mentioned in a record.
Previously, Ancestry.com also included Historical Insights: national events that may have affected the person’s life. They still appear if you saved them; if you hit Ignore, they will disappear permanently.
As you scroll down the automatically generated timeline, you may find things you want to change. You can do so either directly on the LifeStory tab by clicking Edit, or by going to the event in the person’s Facts tab. Note that items in gray are imported from a relative’s profile (e.g., the birth of a sibling), and must be edited in that relative’s profile.
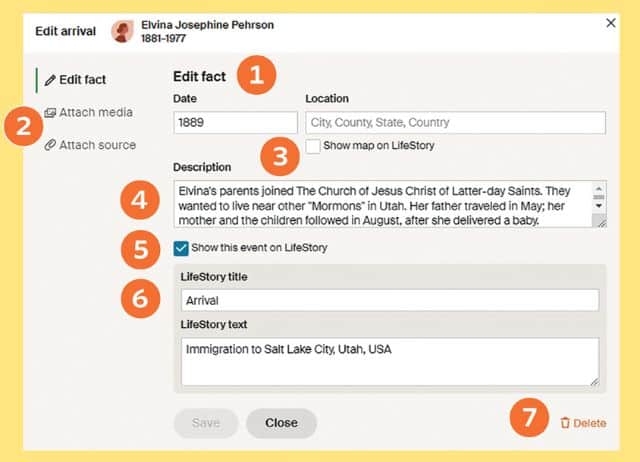
Here’s a look at the LifeStory edit screen:
- Use the fields (which will differ based on fact type) to add or change the details of an event.
- Attach media and/or a source to the event by choosing the appropriate option, then clicking the plus sign. (Note that a fact’s media items appear in LifeStory; sources do not.)
- Toggle a map of the place the event occurred.
- Add description text that will appear in LifeStory. Though the field comes before the LifeStory title and text in Edit mode, the description will display after them when published.
- Uncheck “Show this event on LifeStory” to remove it from view. This will also remove the Title and Text fields.
- Customize the LifeStory’s title and descriptor text, giving you three fields in total to describe the event.
- Delete the entire Fact. Note that this also deletes the fact from the person’s Facts tab, but doesn’t delete any attached Sources or Media items.
You can print LifeStories to share with your family. From the LifeStory tab, open the Tools menu and select Print. Customize the elements to include (a mini-tree, a map, family events and any Historical Insights), then choose your print option. The blue print option sends your file to your computer’s default printer. But the green button takes you to Ancestry.com’s print partner, MyCanvas, which can create family history books, posters and calendars.
Story
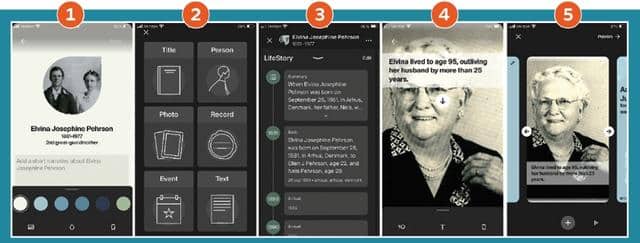
The free ancestry mobile app (available for both iOS and Android) has its own storybuilding function. On the home screen is a “ribbon” that displays Stories, presentations created by you, other users or Ancestry.com itself.
A Story is made up of slide-like screens that you string together to create a short narrative about a person, usually a recounting of a major event (birth, marriage, immigration, etc.) or a summary of their life. You can either create a new Story, or finish one that Ancestry.com suggests.
The above shows some key Story features:
- Ancestry.com automatically generates the initial title card with basic information about the person imported from your tree. You can add or edit text by tapping text fields, or use the teardrop icon to change the background color. Delete a slide with the trash icon. A small photo icon (available on certain slide types) allows you to add media from your mobile device.
- Tap a slide to zoom in or out on it. When zoomed out, you can tap the + icon to add more slides to your presentation. The different options—title card, person, photo, record, event and text—allow you to add multiple kinds of media. You can discuss just one person or event, or broaden your Story’s scope.
- The Event slide type opens a menu for selecting the kinds of events that you see in LifeStory. (As a result, you may want to populate LifeStory before trying to make these.) If you don’t see the choices you want, go back to your relative’s tree profile—either in the mobile app or on your desktop computer—and add them.
- When adding photos, tap the motion icon (lower left) to make the image zoom in or pan horizontally or vertically. The T icon adds a text caption, which can be repositioned with the arrow.
- Reorder the slides using the left/right arrows. Press the triangular button to preview your Story in presentation mode.
When you’re satisfied, press Done, then Publish. Your Story will appear in your Story ribbon.
As of this writing, you can only create, share and view Stories using the mobile app. Other users who have that person in their Trees will see your Story in their story ribbon, too. Sharing any other way requires video-capturing while you’re playing it on your phone. Over time, it’s likely this tool will become more powerful, flexible, accessible and shareable.
DNA Communities
Ancestry.com’s storytelling tools aren’t limited to family trees and photos. The site also has a tool that uses DNA to share insights into your ancestors’ experiences. If you’ve tested with AncestryDNA (or have tested a relative in the past and manage their test through your account), click DNA > DNA Story. Nestled in the Ethnicity Estimate might be another designation: DNA Communities.


Communities compare a test taker’s DNA with that observed in historical populations that lived and migrated together. Each is typically associated with a geographic place and has an interactive timeline, as well as a brief history about things like local industry, culture and factors that influenced migration. It’s not specifically a history of the test taker’s family, but it puts the test taker’s ancestors in historical context.
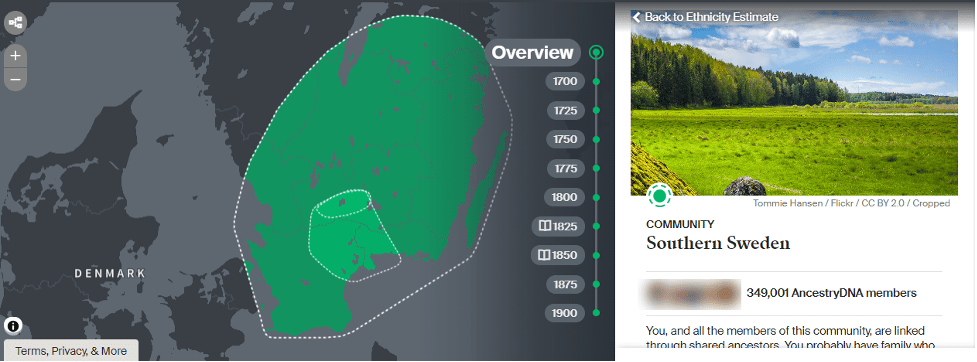
My Grandma Ellen’s DNA Story reveals insight into her grandmother’s immigrant experience. Elvina, my grandmother’s grandmother, came to the United States from Sweden. As a result, my grandmother has been placed into multiple Swedish Communities. Her Southern Sweden Community brings together two even more-specific Communities, forming a kind of bullseye over the town where Elvina’s parents were born.
Crossing the Atlantic to the United States, Ellen’s Communities also include Mountain West Mormon Pioneers. This refers to the Latter-day Saints migration, of which Elvina’s family was part.
Note: Communities are most likely to show up in DNA test results of older generations, who are genetically closer to each Community. None of these Swedish Communities show up in my dad’s DNA test results, nor in mine.
FamilySearch Story Tools
The free FamilySearch website invites users to contribute to a single, public Family Tree that has collaborative person pages. Ideally, the Family Tree includes just one profile for each deceased person. (Any living people in the Tree—that is, those without death dates—are hidden.)
Each profile contains biographical and genealogical details that may have been contributed by multiple users. These are then fed into helpful AI tools that practically spoon-feed you ancestral stories. (Of course, you should always evaluate information you find in the FamilySearch Family Tree.)
If you have already connected yourself to FamilySearch’s Tree, click Tree and navigate to the page of your person of interest. If you aren’t connected to the Tree, select Family Tree > Find from the home page, then enter an ancestor’s information to see if a person page has already been created for them. If not (and you want to create one yourself), you’ll need to create a free FamilySearch account.
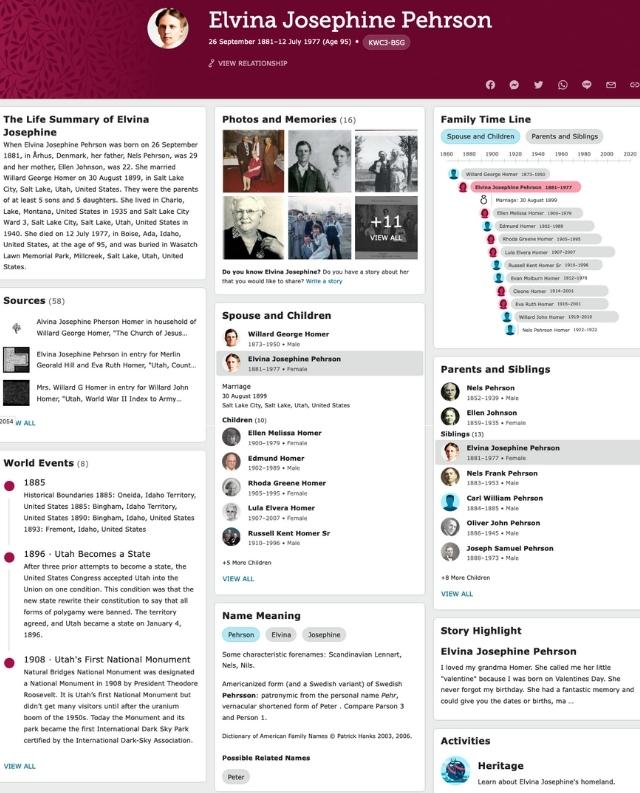
The above shows the Discovery view for my great-great-grandmother Elvina’s profile. The page as a whole tells a narrative, but the following features are especially story-driven.
Life Summary
This text is automatically generated from Tree profile details. It’s a great starting point, showing the “broad strokes” of someone’s vital events, migrations and family. For some relatives, it might be all you need to caption their entry in a family photo album or compiled history.
In fact, Life Summary can act as a great template for biographies you write yourself. Fill in the blanks for your own ancestor, then expand and revise as you like.
Family Time Line
This view can help you see meaningful patterns at a glance, such as how many children lived to adulthood and whether any relatives died at the same time. Scroll down farther for World Events, which lists some relevant historic events.
Photos and Memories
Other descendants may add reminiscences, life sketches, digitized photos, family letters and other attachments at any time. Biographical details from Memories do not automatically populate to a person profile’s Details; you may need to add them yourself before they will appear in the Life Summary, Time Line and other AI-generated content.
MyHeritage Story Tools
At subscription website MyHeritage, you’ll find the most advanced AI storybuilding resource we’ve discussed so far: DeepStory. And you may also appreciate the site’s Genetic Groups that can contribute to your family tales, too.
DeepStory
This tool went viral when it launched—and for good reason. It animates your ancestor’s photo such that it “talks,” and automatically generates an accompanying life story script from family tree details. In the resulting video narrative, your ancestor appears to be telling their life story. Subscribers have unlimited use—and anyone can try it out.
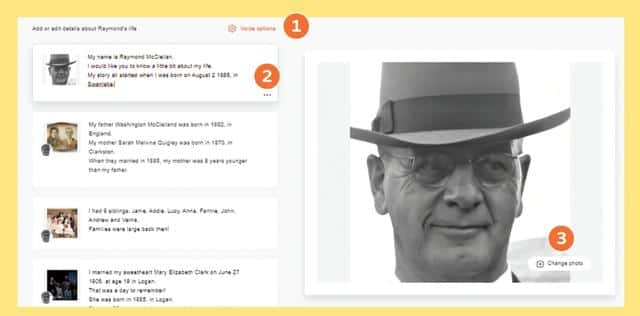
Here are some of the tool’s key features:
- Under Voice Options, select the voice that best fits the regional accent and talking speed you want. There are even options for children’s voices.
- MyHeritage generates individual “chapters” based on life events. Click on a chapter to edit the text. The three-dot menu in the lower right of each chapter lets you listen to the narration, and delete or add to it. Different kinds of chapters (immigration, achievements, personal stories, etc.) deliver information in different ways.
- The photo in the opening chapter will be animated with AI-based lip-sync technology. For best results, choose a clear, forward-facing head shot. If you add additional photos to later chapters, the “talking” photo will move to a lower left position on the screen.
As with the other AI tools, an ancestor’s DeepStory will be most accurate and complete when its source (their tree profile) is also accurate and complete. Similarly, if you want the best-quality images, consider applying MyHeritage’s photo repair, colorization and color-correction tools to your images before creating the DeepStory; learn more about them.
Genetic Groups
Your DNA test results at MyHeritage may be assigned to any of their 2,000-plus Genetic Groups (available to those who test with MyHeritage or upload their results from another service and pay a one-time fee to unlock advanced DNA tools). Similar to the previously described Communities, Genetic Groups associate your DNA with specific communities or migration paths. Stories about your Genetic Groups—and screenshots of their locations—can add to your storybuilding.
My Grandma’s MyHeritage DNA test links her to Genetic Groups for Southern Sweden (who are connected to descendants in the United States) and Mormons in Utah, Idaho, California, Arizona, Wyoming and Colorado. The first references her great-grandparents’ birthplace, though not with the same precision as the Ancestry Community.
There’s not as much historical context for her Groups, either. But the interactive timeline and other details (such as common names and ethnicities) can be useful. And Genetic Groups may find some communities of origin that AncestryDNA misses.
However you want to share your stories—timelines, narratives, slideshows or video animations—today’s giant genealogy websites make it easy. Their powerful tools show off your best discoveries in fun and attractive ways, and the automated stories they build can reveal gaps in record trails. Best of all, they free you to focus on discovering even more stories to share.
A version of this article appeared in the November/December 2022 issue of Family Tree Magazine.
Related Reads