Sign up for the Family Tree Newsletter! Plus, you’ll receive our 10 Essential Genealogy Research Forms PDF as a special thank you.
Get Your Free Genealogy Forms
"*" indicates required fields
In this article:
2. Handwritten Recipe Tea Towels
4. Military Memorabilia Display
5. Four Generations in One Photo
6. Vintage Watch Photo Jewelry
We know you’ve got them—countless family history paper and digital files, piles of old family photos, a family heirloom you don’t know what to do with, tucked away in a box. We’ve turned to Pinterest to get inspiration for creative (and easy-to-make) genealogy gifts and décor that let you share family history treasures and records with other family members.
Use these project ideas from Pinterest pinners, bloggers, and the editors of Family Tree Magazine to inspire your own creativity. To replicate these crafters’ projects, follow the link with each project description for more photos and DIY details.
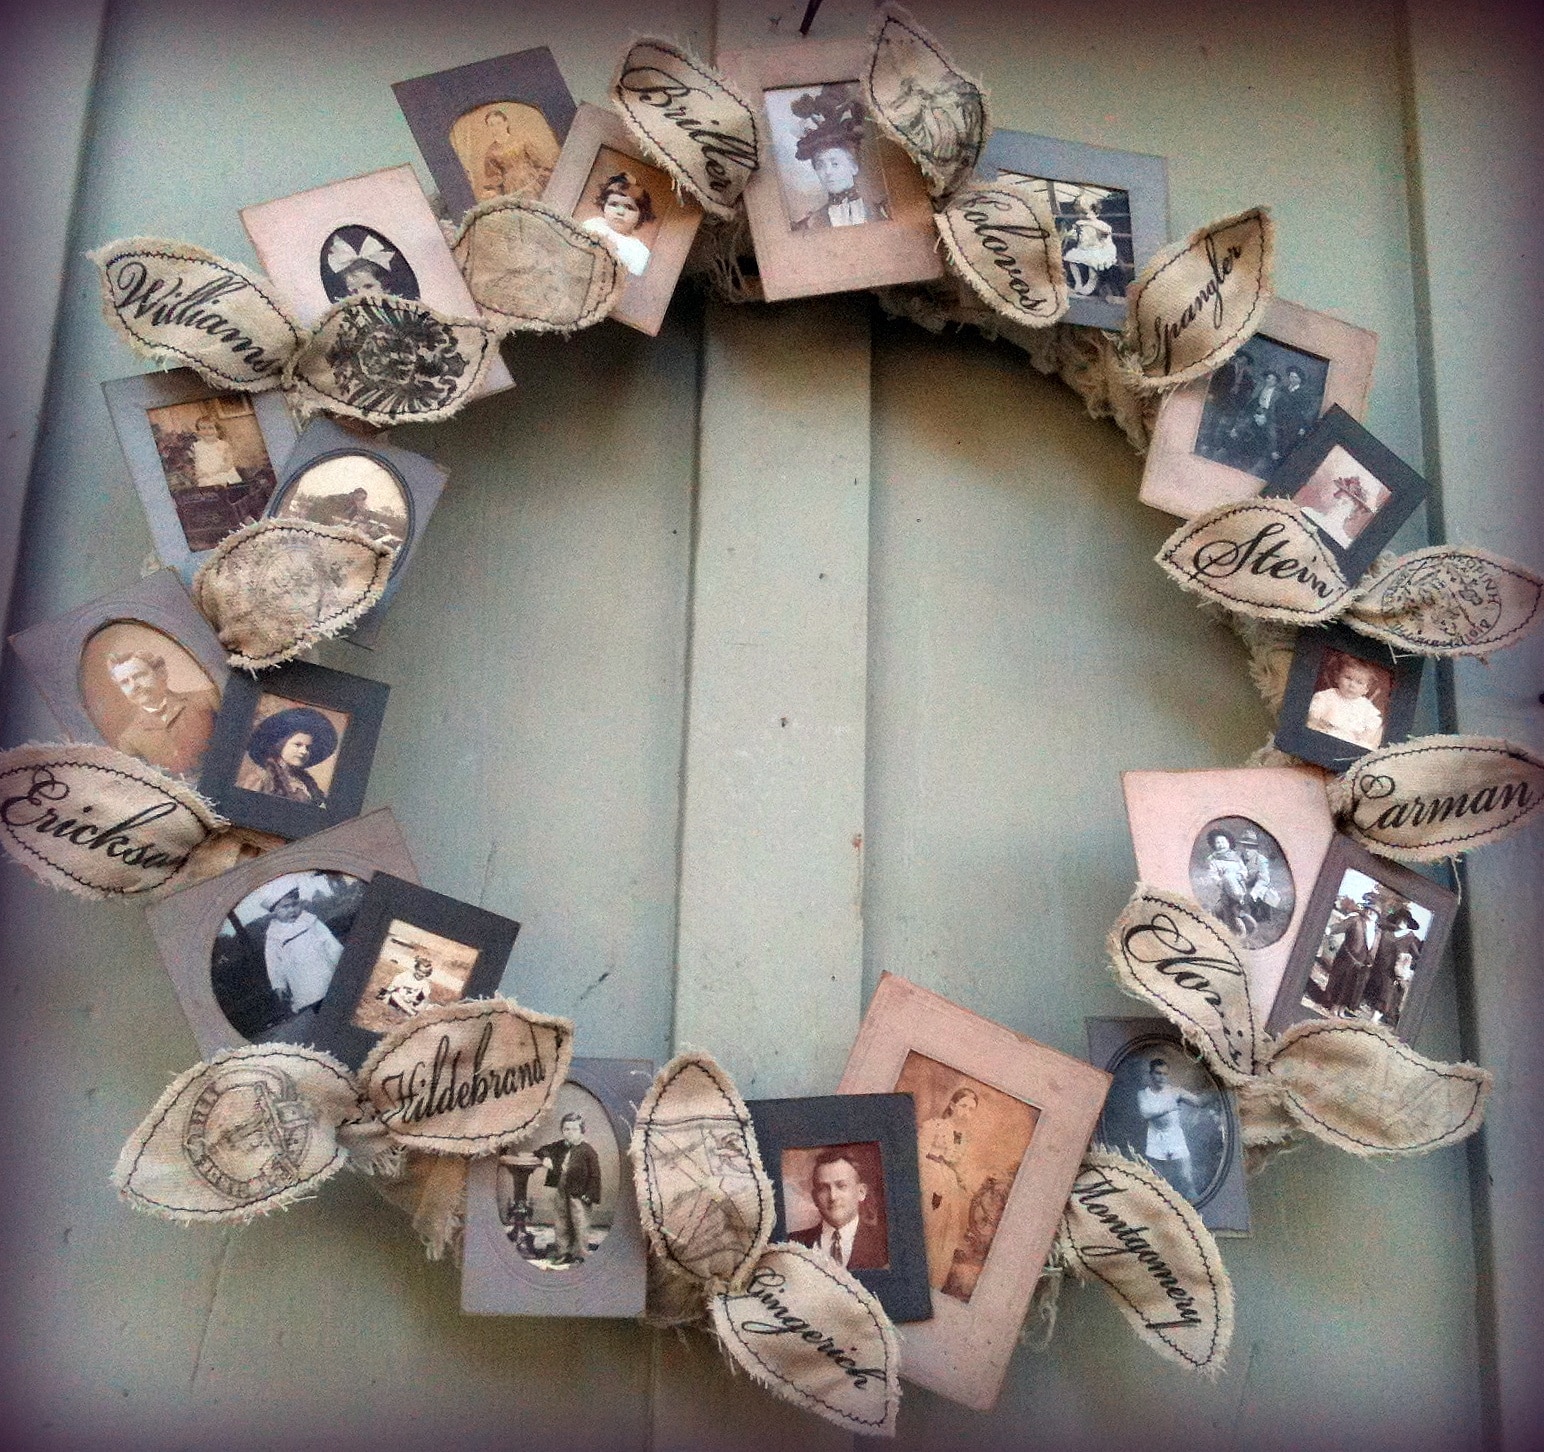
1. Family Photo Wreath
“My husband and I believe in decorating our home with things we absolutely love and that hold deep meaning for our family,” Jenn Erickson says. Guests can see her love for family history right when they come in: Erickson’s DIY family tree wreath is right by the front door. To create it, she selected two photos for each surname and made miniature copies to fit small photo frames (available from craft stores such as Michaels and Jo-Ann Fabric and Crafts). The leaves are the surnames printed onto an old canvas drop cloth and cut out.
ADVERTISEMENT
Using what’s on hand is fine for the wreath backing. “You don’t necessarily need a wreath form,” Erickson says. “You can use strong cardboard or a pool noodle cut to size and taped into a circle with duct tape.” Then cover the backing by wrapping it in ribbon, vintage-y fabric or burlap.
Dana McCullough
ADVERTISEMENT
2. Handwritten Recipe Tea Towels
Emma Jeffery, who writes the Hello Beautiful blog, didn’t want her grandmother’s handwritten recipes to sit unappreciated in a drawer. Printing the recipes on tea towels created something practical and let her see her grandmother’s writing every day.
Jeffery first took photos of the recipes, then used online photo-editing software to “clean up” the images (see the cards before and after). An online service called Spoonflower did the printing. “I asked them to print onto a linen/cotton canvas, which is the perfect fabric for tea towels,” Jeffery says. She recommends ordering extras—once people see them, you’re bound to get requests.
Dana McCullough
3. Framed Vintage Jewelry

Susan Haskins loves to display family photos and heirlooms, so framing her grandmother’s vintage brooch was a project right up her alley. “I have such vivid childhood memories of her wearing that sparkly brooch on her favorite pink dress,” Haskins says.
She painted a small thrift store picture frame and covered the backing with a thin layer of batting and fabric. Then she pinned on the brooch and popped it into the frame. She suggests doing the same with whatever costume jewelry you’ve inherited. “For example, necklaces or bracelets can be displayed in a larger frame by securing the piece to the board using straight pins with pearl heads.” You can get more ideas on Haskins’ blog.
Dana McCullough
4. Military Memorabilia Display
Lorine McGinne Schulze and her husband wanted to protect their family members’ WWI and WWII memorabilia, but also enjoy it and pass it on to their children. The result? A framed display she shares at Olive Tree Genealogy. Schulze arranged her father’s military mementos, including medals and a photograph, the way she wanted, and took them to a framing shop. She and her husband also arranged his father’s death card, war medals and a portrait into a similar framed display.
You can easily adapt this project to whatever mementos—clothing, badges, medals, certificates—you have. “There is no right or wrong way to do this,” Schulze says. She suggests asking the framing shop for coated glass to protect your memorabilia from sunlight.
Dana McCullough
5. Four Generations in One Photo
After seeing a four-generation photo online, Tash Sinclair from Australia got inspired to capture all four living generations of her family in the single photo.
First, she took a digital photo of her daughter and edited it in Adobe Photoshop, changing the color to black-and-white and adding a border. She had her own picture taken holding the photo of her daughter, then photographed her mother holding that picture, and finally, her grandmother holding her mother’s photo.
Sinclair recommends taking the photos in a natural bright light—not direct sunlight—and using the same background in each picture. “My photos were taken across a few weeks in different locations, but I tried to use a white background in each,” she says. You can get a similar effect by taking a photo of each person holding a blank frame and using photo-editing software to add the “nested” portraits.
Dana McCullough
6.Vintage Watch Photo Jewelry
After finding vintage watches at a thrift store, Maize Hutton thought they’d make great jewelry to display a photo. She popped the back off each watch and removed the timepiece inside. “Sometimes you’ll need to also remove the winding stem. You can glue that back in later,” she says. Hutton used photo-editing software to shrink her photos—of herself as a child, her grandson and her nephew—and convert them to black and white. She printed them on photo paper, cut them to size, inserted each into a watch and reattached the back. If you don’t have an old watch to use, Hutton suggests looking on eBay or at a local thrift store.
Dana McCullough
7. Family Photos in Tins Christmas Ornaments
Angie Holden wanted to honor relatives who’d passed away by using their photos in Christmas ornaments. “I love looking at the ornaments and remembering those individuals each year,” she says. To make them, she converted digital photos to black and white and printed them to fit in small metal tart tins and candle trays.
“I laid out which images would work best with each tin, then trimmed the images to fit inside,” she says. Holden used Mod Podge craft adhesive to secure each images inside its tin, and added Mod Podge Dimensional Magic over the photo surface for polish and protection. Let each Mod Podge application dry for 24 hours. Finally, she strung ribbon on the ornaments and hung them on her Christmas tree.
Dana McCullough
8. Family Photo Coasters
After seeing examples of photo coasters online, I thought they’d be a special wedding gift for my cousin Carolyn. As I wrote about on my blog, I planned to use wedding photos from as many generations of the bride’s family as I could find. My aunt scanned the pictures for me, and I used Photoshop to change them to grayscale and adjust the contrast.
I printed the images on photo paper using my home printer and cut them into 4×4-inch squares, the size of the white ceramic tiles I bought (for 16 cents each!) from a home improvement store. I wrote the names of each couple on the bottom edge of a tile using a permanent marker, applied Mod Podge to adhere the photo, and sealed everything with a couple more Mod Podge layers. After plenty of drying time, I brushed on a clear protective coating and applied adhesive felt circles to the back of each tile.
Dana McCullough
9. Census Record Mug

Former Family Tree Magazine Editor Diane Haddad’s husband surprised her one year with a unique Christmas gift: a coffee mug featuring the 1860 census return for her third-great-grandparents, along with a computer mousepad with photos and genealogy records from her Haddad side.
“Greg sneaked into my digital genealogy files and uploaded several images to a photo-gift website,” Haddad says.
“He even checked the file name of the census record so he could make sure the right family was displayed on the mug.” Her husband used Shutterfly to create the gifts (other services, such as Snapfish and Target, have similar offerings). Want to save money on your present? Liking the Facebook page of the service you plan to use is a good way to receive discount coupon codes.
Dana McCullough
10. Ancestor Name Family Tree
Becca Berger’s family is big on genealogy, so when she saw a family tree composed of ancestors’ names on the crafter website Etsy, she wanted to DIY something similar for her grandmother.
Berger used Microsoft Publisher to arrange the names of ancestral couples and their marriage dates in the shape of a tree. Recent family members form the trunk, and generations farther back make up the branches. “It took some trial and error, but I was able to turn the text box in Publisher into an image, allowing me to manipulate the shape of each word,” she says. She explains the steps on her blog. If you don’t have Microsoft Publisher, you may be able to recreate her process using other programs such as Adobe Photoshop or Microsoft Word. Berger printed her tree on burlap, but a linen-textured or decorative scrapbook paper also would look nice.
Dana McCullough
11. Old Letters Wall Art
Interior designer Emily Johnston Larkin’s client first brought her an idea for using old letters in her home’s décor. “Sarah had acquired a lot of handwritten, personal notes from her loved ones over time, and wanted a way to display them in her new home,” Larkin says.
The client selected letters her parents, sister, grandma and others wrote. A graphic designer friend scanned them, then used photo-editing software to convert them to sepia tones, enlarged them and crop them to the client’s favorite part. Larkin matted them in inexpensive square frames from IKEA and hung them on the wall. You can see the effect on Larkin’s blog.
“Don’t be afraid to use a note that might not look perfect. These imperfections are what give the notes character,” Larkin says. “The grandmother’s note is written on a slant, unlike the other notes. Sarah smiles every time she sees it.”
Dana McCullough
12. Family Tree Chalkboard
Leigh Anne Wilkes created the family tree chalkboard as part of a blog challenge to create family photo displays. “I wanted to do something for the challenge with my old family heritage photos,” Wilkes says.
She decided to display four generations. First she spray-painted a frame from Goodwill, cut a board to fit inside the frame, and painted it with chalkboard paint. Wilkes ordered reprints of her favorite photos and matted them on white scrapbook paper. She secured them to the chalkboard with double-sided adhesive and used a chalk pen to add names and show family connections.
If you’d like to make a similar display, don’t worry if you don’t have photos for every ancestor. “I’m missing a few photos on my tree,” Wilkes says; she just included the names of those relatives.
Dana McCullough
13. Ancestor Coloring Book
Marilynn Stewart wanted to include younger generations in family history activities at an upcoming reunion. Her solution? A heritage-themed coloring book for the youngsters.
It featured her husband’s pioneer great-great-grandpa, William Stewart. Stewart got ideas from coloring books and free printable coloring pages such as those at ThoughtCo, as well as immigration ship photos from TheShipsList.
She used the images and family history details to create a story for the illustrations. “The trick is to make your story match the pictures you have,” Stewart advises. “If you’re talking about how far Great-grandpa walked, find a picture of a pair of old boots.” Also be sure to include a map of where the person lived or emigrated from. You could use Microsoft Word or Publisher to arrange the words and images, and print copies. Staple them or have them spiral-bound at an office supply store. See Stewart’s coloring books at FamilyReunionHelper.com.
Another idea? Use family photos. See our step-by-step instructions for making a coloring book from family photos here.
Dana McCullough
14. Family History Photo Book
Photo books are a classic family history project. Plus, their simplicity makes them extremely versatile. The subject of your book could be a single ancestor, like this photo book our editor Diane made about her grandfather as a young man. Or it could be about a place or a journey your family took. Your photo book could include special extras like letters, maps or even timelines. The possibilities are endless, all you need is a collection of photos!
Rachel Christian
15. Fun Family Newsletter
With all the great online design tools out there like Canva, it’s easy to make a fun, personalized family newsletters. Create a newsletter to distribute during the holidays as an alternative to traditional Christmas cards, or hand them out at family reunions. Get creative with the contents and design of your newsletter. (Maybe there could be a Family History column?)
You could design your newsletter after a newspaper like The Mushroom Gazette below, or make it look more like a book or magazine. Like photo books, this project is endlessly versatile.

Rachel Christian
16. Acrylic Gel Transfers From Old Family Photos
Photo transfers are an easy way to create wall art out of your favorite family photos. This project looks fancy, but it doesn’t require any special editing or crafting skills which makes it a great project to do with kids! Learn how our former editor Vanessa made an acrylic gel transfer to hang in her office.

Rachel Christian
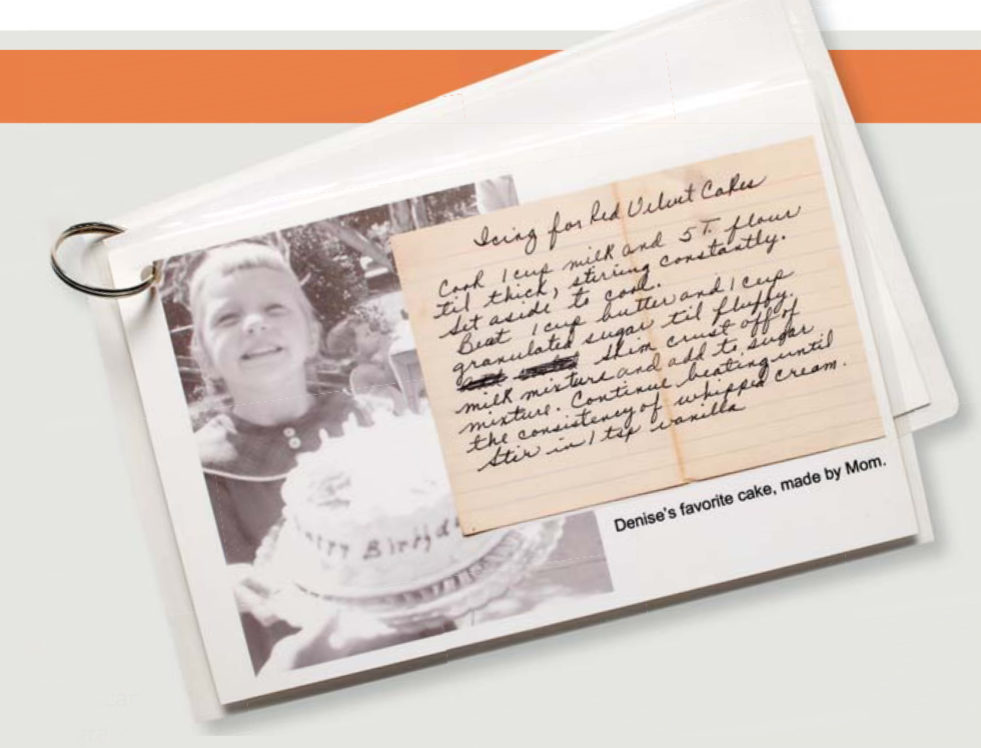
17. Favorite Family Recipe Cards
Preserve your family recipes by creating these personalized “Favorite Recipe” cards. Adding photos and captions along with the recipes are a way to preserve both special dishes and memories, plus it makes a great gift for others who want to carry on the traditions!
Having trouble following your old recipes? Learn how to convert old measurements with our handy chart.
Rachel Christian
18. Heirloom Ornaments From Family Treasures
My stepmother-in-law, Jeanne Morton, has a special gift for turning old family treasures into new heirloom ornaments and keepsakes. She prizes family artifacts but is practical about what’s worth keeping. Brilliant with paper and fabric crafting herself, she also sometimes hires others to make just the perfect “new heirloom.”
A few years ago, Jeanne considered two special family textiles: her own First Communion dress and a piece of her mother’s embroidery work. They are both beautiful and have great sentimental value, but aren’t easily displayed or shared among several relatives.
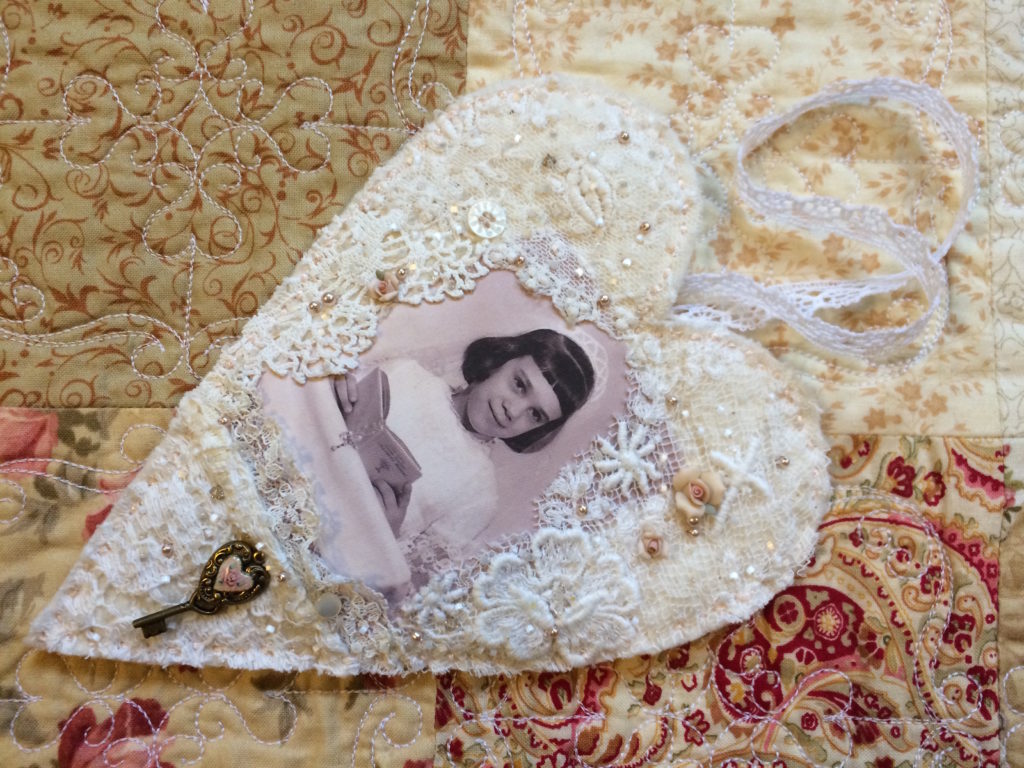
Her solution was creative, and to a preservation-minded genealogist such as myself, a little daring. She decided to cut them up to make new and beautiful heirloom ornaments for herself and her two granddaughters. She loved the vintage-themed lace hearts she saw on the Sweet Inspirations Etsy shop run by Shannon Bolanowski in Flushing, Mich. Jeanne sent Bolanowski the little dress, her First Communion photo and the embroidery, with a request that she make three custom memory heart ornaments from them.
Bolanowski thinks of the memory hearts she makes as a way “to remember someone that has passed on or to remember someone special or a special date. I have created them when babies are born, for weddings and I have just a bit ago created one for a family of a young teenage girl who died in a car accident (that was hard!).”
However, when she got the order from Jeanne, Bolanowski remembers resisting it. “I just did not want to cut up that precious dress! I showed my husband the dress when it arrived and he said, ‘You can’t cut that up!'” But she says the resulting ornaments were worth it. “It was a pleasure to make the hearts for Jeanne and she had such lovely items to work with. I enjoyed that project so much.”
The memory heart Shannon created for my daughter Seneca is about 7 inches tall. On one side is Jeanne’s First Communion photo, framed with fabric and trimmings from the dress she wore in the picture as well as some new embellishments. The other side displays the embroidery work, also partially covered with more lace from the dress. The ornament hangs from Seneca’s vanity mirror in her bedroom.

Shannon has done other projects that repurpose her customers’ heirloom textiles. “I create the heirloom items usually on request,” she says. “I have done a boy’s Christmas stocking out of little onesies for a first stocking and I have done some tattered ornaments from flannel shirts of a lady’s father. She had me do the ornaments for her siblings for Christmas.”
I love these ideas for repurposing old family fabrics that deserve remembering and creating heirloom ornaments that easily transfer to the next generation.
Sunny Morton
19. Heritage Plant in a Pot
A heritage plant is special for some reason—maybe it’s lamb’s ear descended from Grandma’s garden, Dad’s favorite herb or a rooted ivy cutting from a cousin’s wedding bouquet. Buy seedlings at a nursery or propagate ones from your garden.
Supplies
- blank cardstock tags (from a craft store)
- fine-tip pens
- heritage plant
- small flowerpot
- potting soil
- sheet moss
- raffia or ribbon
Instructions
- On the tag, write why the plant is significant to your family history.
- Place moss in the bottom of the flowerpot. Add soil and the plant. Water, add more soil if necessary, and cover the soil surface with more moss.
- Use raffia to tie a tag to each pot.
Diane Haddad
20. Family Recipe Box
Food equals nostalgia, so a box filled with family recipes is a touching gift. Need a shortcut? Buy a recipe box with matching cards and fill them in.
Supplies
- wood or papier-mâché recipe box
- acrylic craft paint
- paintbrush
- fine sandpaper (for a wooden box)
- clean cloth
- water-based spray varnish
- photo of your clan’s best cook
- 8 ½ x11-inch white cardstock
- craft glue
- old paintbrush
- decorative paper
- index card dividers
- family recipes
Instructions
- Paint the recipe box and let dry. If it’s wooden, lightly sand the surface and remove the dust with a damp cloth. Paint the box again. When dry, apply varnish in a well-ventilated area. Let dry.
- Photocopy or print your picture onto cardstock and cut it out. Glue it onto decorative paper and trim the paper to leave a ¼-inch border. Using an old paintbrush, apply glue to the back of the mat. Press it onto the lid.
- If you have old family recipe cards, color-photocopy them onto cardstock and cut them out.
Diane Haddad
Versions of this article appeared in the December 2006 and December 2014 issues of Family Tree Magazine. Last updated September 2022
Related Reads
ADVERTISEMENT

