Sign up for the Family Tree Newsletter! Plus, you’ll receive our 10 Essential Genealogy Research Forms PDF as a special thank you.
Get Your Free Genealogy Forms
"*" indicates required fields
Do you ever wish you could walk in your ancestors’ shoes? Get a craving to know more about their lives than just names, dates and places? Thankfully, you don’t need a crystal ball to see into the past. All it takes is curiosity, creative investigation and the right tool to construct an engaging profile of an ancestor’s life.
Timelines offer a simple and effective way to create that profile. A timeline gives substance to the events of a person’s life by placing them into historical context, and points you to new avenues of genealogy research. It can show an ancestor’s move from one locality to another—or reveal conflicting data you may need to resolve. By illustrating what your ancestor did when and where, a timeline can also suggest how and why your family history unfolded the way it did.
Best of all, timelines are easy and fun to create. You’ll need only a word processing program or one of the timeline apps we’ll suggest, and a little time. When you finish, you’ll have a versatile tool for looking at your ancestor’s life in a whole new light.
What a Timeline Does
Timelines can aid your family history research in many ways. By gathering all the stepping-stones you can find and arranging them in chronological order, you’ll create a personalized path through the past. A well-constructed timeline:
Organizes
A chart of ordered events gives a valuable overview of your ancestor’s life. At a glance, you’ll see milestones such as marriages, changes in occupation or residence, the births of children, the death of a parent or spouse, military service and other significant dates.
Reveals
Your ancestor didn’t live in a vacuum. Adding relevant historical events to your timeline reveals the impact of social, political and economic circumstances. This helps you understand how events affected him and his family.
Illuminates
A timeline can expose gaps in your research, as well as conflicting information you need to resolve. It can also help you solve tricky identity puzzles by anchoring your ancestor to a particular place at a certain time.
Suggests
How did your ancestor get from Point A to Point B? Why did he take a new job? What did she do after her husband died? A timeline might suggest possible migration routes, or shed light on why things occurred.
A timeline also can serve as an outline for writing your ancestor’s story, whether for your family or for publication. It’s perfect for sharing with relatives at a reunion. On a research trip, it’s handy as a quick reference to the names, dates and places you’re investigating, as well as the sources you’ve already checked. With their myriad of uses, you’ll find yourself turning to your timelines again and again.
4 Steps for Making a Timeline
You don’t need expensive software or special skills to build an effective timeline. This tutorial will show you how to construct one using the Table function built into your word processor, such as Microsoft Word. If you prefer, you can use the same technique with a spreadsheet program, such as Microsoft Excel.
1. Create a template.
First, create a blank chart to use as a template for multiple projects. In a new document, write a title such as: Life Events Timeline for [Name]. Decide whether you want to create your timeline in portrait or landscape orientation. Landscape gives you more space to write. In Word, you can change these settings using File > Page Setup. If you select portrait style, change the document margins to 1 inch on both sides, to make your chart wider.
Using the Table menu, select to insert a table seven columns wide by 20 rows deep. (If you don’t see this, add a table using the Insert menu.) If you’d like to adjust the font, select the whole table and go to your font settings. Arial or Calibri fonts at 11 pt. size work well. Label your columns with the following headings: Date, Age, Event, Place, Source, No. and Notes.
Next, adjust the width of the columns. Hover over the column line after Age or grab the # sign at the top of the document workspace, and slide it to the left as far as possible, to make a skinny column. Do the same with the No. column.
Expand the Notes column to the right to use the space you just freed up. As you create ancestral timelines, you can adjust the size of your columns as needed. Be sure to save your document, using a name such as Timeline Template.
To use the timeline for a specific ancestor, you can either copy and paste the entire table into a blank document, or use the Save As command to rename it as a different file, such as Timeline George Clark. Starting each one with the word timeline followed by the ancestor’s name enables you to find them quickly in your documents folder.
2. Fill in your ancestor’s life events.
Now the fun of developing your chart begins. For this step, you’ll need your research notes or genealogy software to refer to. Type the person’s name at the top of the document. Enter your ancestor’s date of birth (actual or estimated) in the second or third row of the chart. List events in chronological order, skipping one or several lines to allow room for future entries. (You can always insert rows later, too.)
Events to list include: birth, baptism, census enumerations, marriages, land purchases and sales, tax assessments, voter or draft registrations, religious memberships, military service, immigration, naturalization, city directory listings, employment, divorce, pension applications, death, burial and probate or estate settlements. Don’t worry if you know only some of these things—after all, you’re creating a research tool you’ll use to find out more.
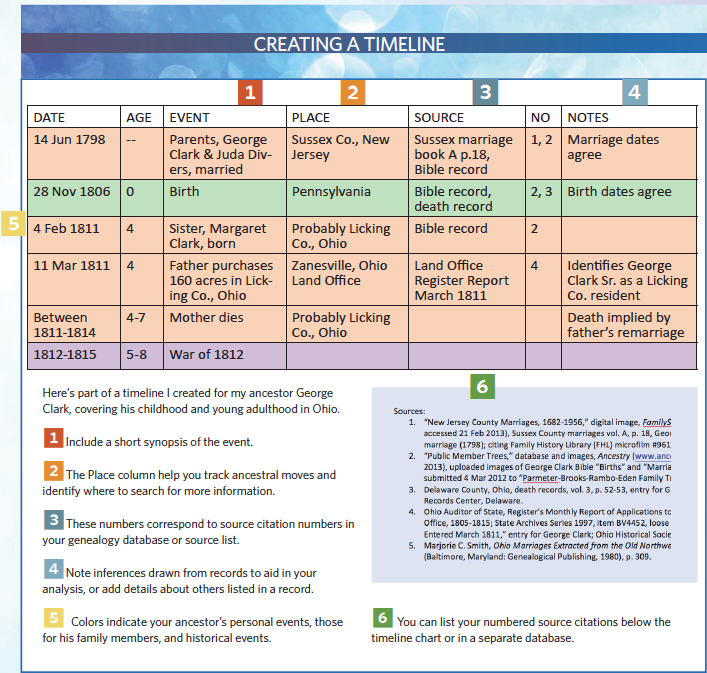
Column by column, your chart will look like this:
- Date: Use a short, standard format, such as 05 Apr 1837. For an estimated date, use c. 1837 or abt. 1837, or a range of years (1835–1839).
- Age: Put age or approximate age at time of the event.
- Event: Briefly describe what happened, such as “Marriage to Mary Edwards,” “Head of household in census,” “Witness to Robert Edwards’ will” or “Sells 80 acres of land.”
- Place: Indicate the town or township, county and state or country where the event took place. Use words like possibly or probably if you’re unsure.
- Source: A short description of the source, such as “Blount Co. marriages, v. 3 p. 73” or “1850 census p. 122, fam. 380, James Clark,” gives you a quick way to identify where you found the information.
- No.: This number corresponds to your full source citation. You can use the source number from your genealogy database, prompting you to find the full citation there. Or you can number the sources independently (beginning with 1), and provide citations at the bottom of your timeline. This gives you a stand-alone research tool.
- Notes: Here you can record specific details and comments, such as a land description or the names and ages of other people in a census record. You also could indicate whether a record agrees or conflicts with information from another source, to aid in your analysis.
To add even more usefulness to this framework of your ancestor’s life, use color color-coding. Color can (for example) show which events pertain directly to your ancestor, which correspond to other family members and which provide historical context. Highlight a row where you’ve entered text. In the Word formatting palette or ribbon, select Shading. Use Fill Color to mark all events that fit into a certain category—e.g., pale green for the person’s own life events. (We’ll discuss colors for different kinds of events below.)
3. Expand the family circle.
Many other people played a role in your ancestor’s story. What about the family she was born into? If you know her parents’ names, you might begin your timeline with their marriage. It’s helpful to add information from the census record where they lived before her birth. If desired, you could note the births and marriages of her siblings. Because a parent’s death may have generated valuable records, you’ll also want that on your list.
Now enter details on the family she created. Fill in birth information for her spouse and each of her children. Enter the dates and places where children married or died. The death of a spouse is a pivotal event; if you don’t know the exact date, you can indicate a range of years (i.e., 1866–1870).
Depending how you plan to use the timeline, you may want to include information about brothers- and sisters-in-law, too. Extended family groups often migrated together, and these relationships can be key in confirming an ancestor’s identity in a specific place and time. Similarly, the death of a father-in-law serves as a cue to look for estate records. For challenging research problems, you could add entries for court documents, deeds or newspaper notices with the names of neighbors or friends who were witnesses or bondsmen.
Color-code your entries for this step with a different color, such as light orange, to show they correspond to other family members.
As your chart fills up, you may run short of rows. To add additional lines, copy one or more blank rows, position your cursor under the table, then paste. To insert rows in the middle of the table, highlight a row and right-click on Insert Row.
Surprised by how much you actually know about your ancestor? Or wondering where she was for 20 years between records? Maybe you’ll find clues hidden in history. The next step is to discover how your ancestor fit into the world around her, and how that world might have affected her.
4. Add moments in history.
Like today, our ancestors were impacted by events occurring at the global, national, state and local levels. In understanding their times, it’s helpful to think of these as a pyramid. Picture distant world events, which generally had less influence on their day-to-day lives, in the narrow peak. National events, such as the start of the Civil War, completion of the Erie Canal and discovery of gold in California, affected them more and can help you envision their times. The construction of roads, canals and railroads through their state, new industries and other developments at the regional level had a still greater impact.
Yet to gain a real understanding of your ancestor, you need to get down to the largest and most influential base of the pyramid—the local level. When did the railroad line come to town? Did outbreaks of disease ravage the community? Was there a flood, blizzard, hurricane or other natural disaster? Did the town hall burn down?
Pick events that seem most relevant to your ancestor’s life, as well as those that help define an era. The timeline for a Midwestern pioneer might include the date of statehood, the War of 1812, an outbreak of cholera and construction of the National Road. For a Southern woman during the Civil War, you might list her state’s secession date, nearby battles, a supply shortage and the war’s end. It’s also helpful to note boundary changes that could affect where records are found.
An immigrant ancestor’s timeline will include events that occurred both in his homeland and in his new residence in America. Consider the factors that pushed an ancestor to emigrate, such as a war, crop failures or religious persecution. Also consider things that pulled him to a new location, such as the availability of land, or jobs with railroads or textile mills.
Where do you find this kind of social or historical perspective? Check the websites of local and state historical societies to see whether they’ve compiled timelines or summaries of important events. Try a Google search using the name of the state or county and the words history timeline. You can often find chronologies for special topics, such as railroad history, the same way. See our roundup of social history websites for more ideas.
Old county and town histories are a good source of state and local detail. Many of these can be read or downloaded free at Google Books, HathiTrust and the Internet Archive.
Adding even a handful of relevant events to your timeline will bring your ancestor’s world into sharper focus. Color-code these entries using a third color, like violet, to indicate they show historical context.
Using a Timeline in Your Research
Congratulations—you’ve created a unique visual synopsis of your ancestor’s life and times to reflect on, use, and share. Now how do you use it in research?
Step back and consider what your finished timeline tells you about your ancestor’s life. What overall themes or patterns emerge? What clues does it give you? Is there a gap where he’s missing for a period of time? Can you see what may have motivated, challenged or attracted him? Think about the picture it paints of him and his times.
Write down the questions that pop into your head as you study the timeline. Use those questions to create a research plan or list of resources you want to explore further. Is there a particular aspect of your ancestor’s life you want to know more about, such as immigration or military service? Set that topic as your focus, and investigate where you might find additional records. See our sample family history research plan for an example of a targeted research plan.
Similarly, if your timeline has exposed conflicting evidence, create a plan to research the matter and resolve the conflict. If a boy was 8 years old in the census, and you have a marriage record dated two years later, something is amiss. Be suspicious of attributing births to women over 45 years old, especially prior to the medical advances of the 20th century. Take a good look at your locations. No matter how talented your ancestor was, he couldn’t have been in two places at the same time. Might you be looking at two people with the same name?
Print your timeline or upload it to a cloud-based service, such as Dropbox or Evernote. Take it along to libraries, courthouses, archives, cemeteries and places where your ancestor lived. It’s a handy, portable guide to facts about your ancestor and his family, as well as the resources you’ve consulted.
A timeline is a concise, easy way to share information with distant cousins researching the same family. Give copies of your timeline to relatives when you visit them, to spark a conversation or trigger memories. At a reunion, other family members might add details or volunteer photographs. By sharing your information, you open the door to an exchange of ideas and treasures. You can attach your document to an email or share it via Google Drive. Others can add data and send it back to you.
If sharing and presenting are your primary objectives, you’ll also want to look into timeline creation programs, which can enhance your work with photos and graphics.
Top Timeline Programs
Technology offers many other tools for creating timelines. Most popular genealogy software programs have a built-in timeline report, allowing you to click and print your ancestor’s chronology. Computer-generated reports save time, but lack your comments and historical interest, so consider using the report as a basis for building a richer timeline.
Online and software-based timeline programs are fun to explore, especially if you’re looking to share and publish your creation. Many are designed with collaboration in mind. Some of the more popular timeline creation programs and websites include:
- Genelines is a Windows-compatible software program for creating timelines and charts. It accepts GEDCOM files and uploads from several genealogy databases. Users can select categories, fonts, colors and more.
- OurTimelines generates printable timelines from 10 events you enter. It incorporates world and national history within your span of years, and it’s free.
- Preceden lets you make colorful timelines organized by topics and layers, with various privacy and publishing options. Free and paid versions are available.
- Tiki-Toki offers tools for making web-based 3D timelines that you can enhance with images and notes to share or embed on your blog or website. You can get a free or an enhanced premium account.
- Timetoast allows users to create, publish and embed timelines on their own websites. You can add short notes to each point in time. It’s available in free or paid versions.
- Treelines helps you compile short stories and photographs in segments, so you can present your ancestor’s history in an interesting, engaging way. GEDCOM compatibility and flexible design options let you include source information and links to your online family tree. You can keep your presentation private or share it with relatives, and all these features are free.
Now that you know how rewarding it can be to create and use timelines, you’ll want to make them a regular part of your research process. Constructing a timeline engages your most valuable research asset—your mind—to see someone in the larger context of his family and times. The picture that emerges is sure to be a fascinating one, spurring new questions and discoveries. By tracing your ancestor’s steps through history, you might just get the sensation of walking in his shoes.
Example: What to Include in a Timeline

Here’s part of a timeline I created for my ancestor George Clark, covering his childhood and young adulthood in Ohio.
- Include a short synopsis of the event.
- The Place column helps you track ancestral moves and identify where to search for more information.
- These numbers correspond to source citation numbers in your genealogy database or source list.
- Note inferences drawn from records to aid in your analysis, or add details about others listed in a record.
- Colors indicate your ancestor’s personal events, those for his family members and historical events.
- You can list your numbered source citations below the timeline chart or in a separate database.
Resources
Looking for historical events to help put your ancestor’s life in perspective? These resources will give you a head start. To find a chronology for a particular state or subject, do a Google search for the name of the state plus the words history timeline.
Websites and Books
- Cyndi’s List: Timelines
- Digital History: University of Houston
- FamilySearch: Books
- The Genealogist’s US History Pocket Reference by Nancy Hendrickson (Family Tree Books)
- Google Books
- HathiTrust
- History for Genealogists by Judy Jacobson (Genealogical Publishing)
- The History Place
- Internet Archive
- OER Project
- Wikipedia
- USGenWeb
A version of this article appeared in the September 2014 issue of Family Tree Magazine. Last updated August 2024.


