Sign up for the Family Tree Newsletter! Plus, you’ll receive our 10 Essential Genealogy Research Forms PDF as a special thank you.
Get Your Free Genealogy Forms
"*" indicates required fields

If you’re looking for a fantastic digital tool to map your family history, Google Earth can’t be beaten. Here are some ways to utilize this free software for your genealogy research.
Tips for Using Google Earth for Genealogy
Understand Your Ancestor’s Geography
Want to explore your ancestor’s hometown? You don’t have to get into a car or on a plane to see it. Instead, use Google Earth to find the location. In fact, here’s an easy way to get immediate use of the software: Drag the orange pegman to take a look at your location from a street-level view.
Add Historical Context
On the surface, Google Earth offers a modern-day contemporary view of the world, but geographic history is an important element of the program. Here’s a fun tip: Watch for the clock icon to show up in the bottom left along with a date. That tells you that historical imagery exists as far back as that date. Just slide your mouse on the slider to see the imagery from different time frames.
Use the Layers Feature
The Layers panel can provide you with a ton of tools to explore and record your geographical family history. For example, you can look at photos, historical map views, and even explore the history and weather of a place. Some of the layers that you can overlay: National Geographic articles and cultural relevance, David Rumsey Historical Maps, photographs, and more.
Get More Maps
Say there’s no overlay icon showing a David Rumsey map, but you want to see if some exist? No problem! You can download all the maps to create overlays simply by clicking on one of the historical overlay symbols (for example, hover over London on the map) and then click Download Links to all Rumsey Historical Maps.
Vanessa Wieland
Navigating Google Earth
Google Earth lets you virtually fly anywhere on Earth to view satellite imagery, maps, terrain and buildings in 3-D. You can explore rich geographical content and save customized maps, then share them with relatives and genealogy pals. With ancestors originating all over the world and relatives across the country helping to trace them, you’ll find these Google Earth features handy.
Like all Google tools, Google Earth is free. In fact, Google Earth Pro has recently become free, as well, and offers the same benefits—with a few more benefits thrown in.
Viewing area
The Google Earth viewing area contains these panels. See the photo above for the location of these panels:
- Search: Search addresses or places.
- Places: Save and manage files.
- Layers: Access points of geographic interest that can be displayed over the viewing area.
- 3D Viewer: View and interact with maps and activate tools using the toolbar at the top of the viewer.
- The 3D Viewer Toolbar: Toggle buttons to activate tools.
- Navigation controls: The controls include: Look Joystick (top button): Look around from a single vantage point; Move Joystick (middle button): Move your position on the Earth; Zoom Slider (bottom lever): Zoom in and out.

Layers panel
Google Earth’s Layers panel has a number of features family historians will find helpful.
Use one or all of these layers by clicking the box next to the name to select it. It’s important to note that Google changes the layers available on Google Earth without notice. (These features were available as of November 2010.)
- Borders and Labels: Select the Borders layer to see boundaries for cities, counties, states and countries. Select Alternative Place Names to show alternate names on the map.
- Street View: This layer provides a 360-degree, up-close photographic view from a street location
- Gallery: In the Gallery layer, Google Book Search indicates books related to the geographic area. Rumsey Historical Maps will show any historical maps available for the area. In the Travel and Tourism sub layer select Webcams.travel to see live webcams of the area.
- More: In the More layer, try the Geographic Features to identify local mountains and bodies of water. The Place Categories sublayer shows a number of different places including places of worship, cemeteries and schools. The US Government sublayer shows city and postal code boundaries and congressional and school districts.
To learn more about Google Earth exploration, check out this video, “Navigating in Google Earth”:
Lisa Louise Cooke, in the January 2011 issue of Family Tree Magazine
How to Overlay Maps in Google Earth
Google Earth software can illuminate answers to genealogy problems by combining old maps with new ones—layer them together, and you can visualize exactly how an area looked when your ancestors lived there. You’ll find hundreds of historical maps spanning the globe within Google Earth, or you might download the perfect map from a website or find it in a book.
If you’re working with a paper map, you’ll need to convert it to a digital image. I recommend scanning it at the highest resolution your scanner allows—at least 600 dpi (dots per inch), but 1,200 dpi would be best. The higher the resolution, the closer you’ll be able to zoom in on the map. Save the image to your computer as a JPG. Once your old map is digitized, follow these steps to layer it over a modern map in Google Earth.
1. Open Google Earth on your computer.
Enter the geographic location of the map in the Search box and click the Search button to “fly” to that location. In the Places panel on the left side of the screen, click My Places or a specific folder to select where you want to store your old map overlay. Click the Image Overlay button in the toolbar at top of the screen.

2. Name your old map in the Image Overlay box that appears.
Below that, the description field is a great place to cite the source of the map. Clicking the Browse button in this box will let you attach the old map that’s stored on your computer’s hard drive. But then the overlay will work only when viewed on your computer.
If you want to share your map and always have the overlay appear, the map image must be hosted on the cloud. Upload it to a free photo sharing website such as Photobucket, which gives the image a unique URL that you can then use in the overlay. When viewing your uploaded image in Photobucket, click the Direct URL link to copy the link to your computer’s clipboard. Back in Google Earth, click inside the Link field in the Edit Image Overlay box and paste the URL you just copied. After a few moments, the map will appear on the screen within the green placeholder lines.
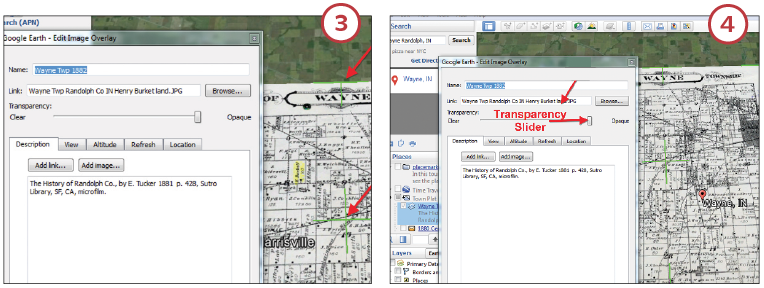
3. Now, you’ll georeference the overlay to match up with the modern day Google Earth map.
In the Overlay box to the left, slide the transparency lever so you can see the current landscape beneath the historical map. Look for unique features on the historical map, such as railroads, towns and rivers. Most locations have some type of distinct element that will help identify a starting point for positioning the map. By adjusting the transparency tool back and forth, you can see both maps until you get them aligned at a selected point.
If you’re fortunate enough to know the land coordinates for the area, you can use Earth Point’s Convert Township and Range tool to plot the outline of the town or specific section of land, making it easier to place a local area map. Once the maps are lined up at a particular point, you’ll notice that much of the rest of the map doesn’t match up. To resize the overlay map until everything lines up, hover your mouse over a green crosshairs line (indicated by red arrows above) and the hand icon will turn into a pointer finger. Use the pointer to grab that spot and manipulate the overlay. (If you hover your mouse over the map in an area without a green line, your mouse pointer becomes a hand, allowing you to move Google Earth and your overlay together.) To resize just the overlay, go to a corner, grab the green line and pull the overlay. Play with it, pulling the various corners until all the landmarks line up.

4. Keep using the transparency lever to check your progress.
The goal is to line up all the landmarks throughout the map. Things may look lined up with the railroad, but the river in the corner might still be out of alignment. In the end, if the historical map you’re working with is accurate, it should line up adequately with Google Earth. When complete, drag the transparency lever all the way to the right so that your old map is opaque. Click OK to close the box. Now you can see your map in Google Earth.

5. If you want to turn this overlay off so it’s invisible, look in the Places panel and uncheck the box for the map overlay.
When the overlay is activated, you can adjust the transparency of the map using the Transparency button at the bottom of the Places panel. Click the button and a lever will appear. Slide the lever to adjust the transparency of the map you’re displaying on Google Earth. Now you see what the land of your ancestors looked like compared to the same place today.
Lisa Louise Cooke, from the July/August 2015 issue of Family Tree Magazine
How to Map Old County Boundary Lines with Google Earth
Changing boundaries have long challenged genealogy researchers: Your ancestors could have records in multiple counties or states, even if they didn’t move an inch. For example, in 1776, Fincastle County, Va., was trisected into Kentucky, Washington and Montgomery counties. In 1780, Kentucky County became Fayette, Jefferson and Lincoln counties; then in 1792, those became the state of Kentucky. It’s hard to keep up—but if you don’t, it’s almost impossible to track down records.
Today, pinpointing the county where your family lived during a given year is easy, thanks to the Newberry Library’s Atlas of Historical County Boundaries. Not only can you view interactive maps showing changing boundaries for each state, but you also can download a boundary timeline for every US county. You can even import the data into free Google Earth software and use the time slider to view county line changes over time. These are our favorite ways to use the atlas:
1. On the Atlas of Historical County Boundaries home page, click a state on the map.
A page opens with a menu of options — you can choose to launch an interactive map, get historical commentary, view an index of county chronologies and more. Below the image of the state is an explanation of each option.
2. Click the Interactive Map option.
At the upper left is the date range the map covers, spanning the creation of the first county (or unsuccessful county proposal) through the year 2000. Note that historical lines are in black; modern boundaries are in brown and white. Here, you can see Florida’s 1825 boundaries.
3. Select the date you want from the pull-down menu in the upper-right corner and click Refresh Map.
Changing the Florida date to 1900 produces a far different boundary map.
4. Zoom in, pan across the map, print and do other tasks using the tools on the left side of the page.
Two options I like are Info and Measure (see arrows). Click the Info button, then click on a county to pop up a box of historical information. To use the Measure button, select it, then click anywhere on the map to place a red dot there. Now, wherever you move your mouse, you’ll get the distance on the map from the dot to your mouse pointer.
5. Below the map, click Chronologies, then Individual County Chronologies for detailed information about boundary changes for each county.
Many counties have confusing and convoluted histories, and this is where you’ll find exact information.
6. Another way to view historical boundaries is to export data from the Atlas into Google Earth.
Back on a state’s page, click Download KMZ Files. This will download a compressed file (with the ZIP extension) to your computer. Double-click the file to unzip it. The unzipped file will have a name like this: FL_Historical_Counties.kmz.
Next, open Google Earth. Click File > Open from the main menu bar, and navigate to the unzipped KMZ file. It’ll be added to the Temporary Places panel. Google Earth will automatically find the state and overlay its historical county boundaries on an aerial photo. Here, you can see Florida’s development in 1826.
7. When you import historical data into Google Earth, a time slider appears.
Move the slider to view boundaries at a specific date or to launch an animation showing the changes. Adjust the animation speed by clicking the wrench icon on the slider.
Experiment with importing the KMZ files for two states your family lived in, then set the animation to slow. You’ll get a visual reference of what area was formed first and how the counties developed in relation to one another.
Nancy Hendrickson, from the September 2011 issue of Family Tree Magazine.


