Sign up for the Family Tree Newsletter! Plus, you’ll receive our 10 Essential Genealogy Research Forms PDF as a special thank you.
Get Your Free Genealogy Forms
"*" indicates required fields
When’s the last time you explored the world’s biggest family tree? Have you checked to see what others know about your relatives? Reconnected old photos of your grandparents’ neighbors with their descendants? Shared family recipes for others to find in the future?
These are just some of the creative ways people are harnessing the power of the global Family Tree at the free genealogy website FamilySearch. With a community-tree model, all users contribute to the same public, common profiles for shared ancestors, rather than building individual trees as you do at sites such as Ancestry.com and MyHeritage.
FamilySearch isn’t the only site to offer a unified tree. You can also find this model at Geni, WikiTree and WeRelate. But with 1.5 billion ancestor profiles, the FamilySearch Family Tree is a giant sequoia compared to these others (which have 175 million, 34 million and 3 million ancestral profiles, respectively).
Accuracy is always a concern in collaborative family trees. Are others connecting rogue relatives to your great-grandparents, or mismatching people who have the same name? It happens. But sources are being added four times as quickly as new names (44 million new sources and 12 million names each month). So while some branches may grow the wrong direction—and you should verify everything you find there—the Tree is, overall, becoming more accurate.
All that data (and the collective wisdom of millions of users) makes the FamilySearch Family Tree a useful resource in its own right. Here, we’ll share ideas and how-tos for using the Tree in other ways, besides documenting your own family. Whether you just want to harvest any good fruit from its branches or help cultivate its growth, there’s plenty you can do with those 1.5 billion names.
A quick note about privacy: By default, FamilySearch Family Tree profiles for those still living are restricted. You can only search for people who are listed as deceased.
1. Find Your Relatives—and Their Friends or Neighbors
“Whenever I start researching someone new—related or not—the FamilySearch Tree is my first stop,” says Cheryl McClellan of Chesterland, Ohio. “What have others already learned about them? What sources are attached?” You can do the same with a free FamilySearch login.
Once you’re logged in, you can start looking for your deceased relatives (or the minister who married them, or the guy who signed their will, and so on). Go to the Search dropdown menu > Family Tree. Enter a person’s name, a place they lived, and birth or death year. (You can also search by the unique Ancestor ID, but—in most cases—you’ll first need to find the person in the Tree to get that information.) Run that search, or hit More Options to enter additional details.
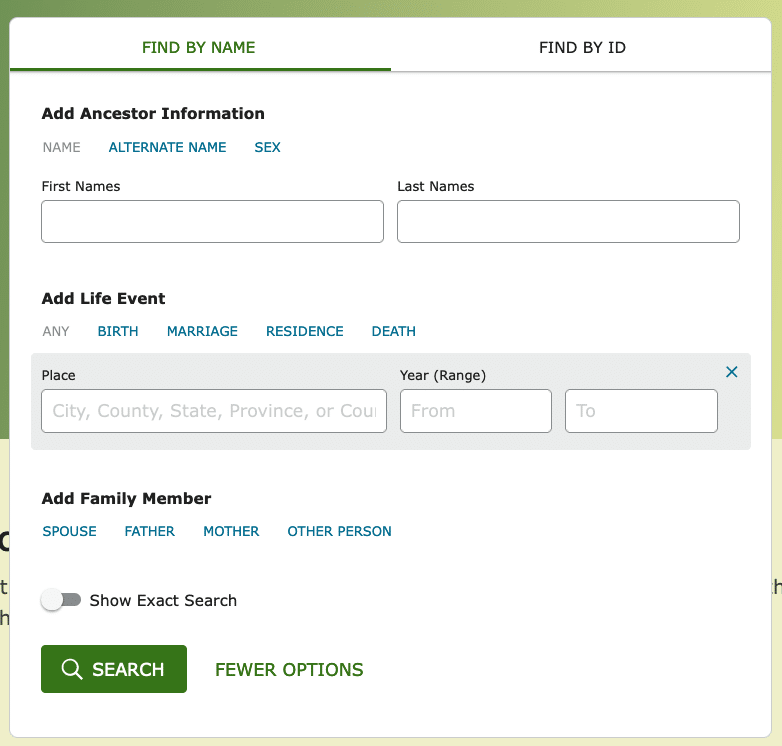
For best results, search for someone who lived two to four generations ago, as they are more likely to have been added to the Tree. Note that the search automatically filters out living people whose profiles are confidential.
Double-click on a search result to view that person’s page, which will have a unique ID number (example: K8QM-TNZ) and shareable URL. Explore all the tabs to find genealogical data, sources, notes, documents, memories and photos attached to that person. Click in the Family Members section (if showing) to learn about parents and any siblings, spouse(s) or children.
Use all of that data to determine whether this profile is for your person of interest. If so, you can click Follow at the top to be notified about future changes.
Don’t search just for direct-line ancestors. You can also use the Family Tree to study your collateral relatives (cousins, aunts, uncles, etc.) as well as others who were associated with your ancestor.
For example, maybe you want to learn about a godparent or witness listed in a church record, or determine how a pallbearer knew your deceased ancestor. Take note of neighbors in censuses and city directories, then search the Tree for them to learn about how their lives intersected (and grew apart) from your ancestor’s.
2. Share Family Memories
Meri Rees of Miami uses the Tree to share favorite family memories. “I posted a generational recipe, and my granddaughter found it and made it,” she says. “I love to think that someday another generation will link to us through this recipe.” Her post got its own dedicated landing page and is linked to the relevant ancestors.
It’s easy to share family photos, documents, memories, stories or heirlooms on a deceased relative’s FamilySearch person page. And (as with the rest of the Tree) you can contribute materials whether or not you created the person page.
First, search for the deceased relative’s person page. If you don’t find one, you’ll need to create one. You have two options:
1) Find the person page of one of their first-degree relatives. Under the Family Members section, click the option to Add Spouse, Add Child or Add Parent.
2) Click Family Tree > Tree > Recents > Add Unconnected Person (If you don’t find a first-degree relative already on the Tree.)
You can add living people to the Tree and attach documents and other media to their pages. However, you’re the only one who will be able to see it. It won’t become public until you add a death date to the person’s profile. You can share living members with family members on FamilySearch by creating a Family Group Tree, which allows you to collaborate and share information on living relatives with specific family members while keeping it private to the general public FamilySearch community.
How to Add Memories
On the person page, go to Memories > Add Memories. You may record audio, type a story or upload a PDF, image or sound file (up to 15MB) from your device, your FamilySearch Gallery or Google Photos. Next, take a few minutes to label and tag your Memory:
- Add a descriptive title.
- Use the drop-down menu to rotate or re-download images, as needed.
- Bookmark your favorites for faster access.
- Share on social media.
- Mark as Private (viewable by only you) or Public (viewable by anyone).
- Tag other person pages to attach to other relatives on FamilySearch.
- Add other details and topic tags, if you like.
- Record an audio file with your memories or (in the comment area below) add a caption.
Note: The default privacy setting for a Memory is Public. Please consider the privacy of living people when deciding what items and stories to upload and make public.
3. Collaborate with Fellow Descendants
Fellow FamilySearch user Jillene added a note to a 1955 photo attached to my great-grandaunt Janie McClelland: “I’m pretty sure that the lady in the striped dress is mislabeled,” she wrote. “She is not Addie Elizabeth, but Anna Elmira. She is my grandmother.” Thanks for that, Jillene!
When you add to, edit or correct information on relatives’ pages like this, you join millions of collaborators. But you can also reach out directly to other FamilySearch users. “I found someone willing to do DNA testing,” says Patti Hobbs of Santa Clara, Calif. The person was “a contributor to our common ancestor’s information.” You may also want to find cousins who are researching your shared roots, or descendants who still live in your ancestral hometown.
On an ancestor’s person page, look for comments or changes made under the Sources, Collaborate and Memories tabs. (Usernames will appear in small letters next to a circle icon showing their profile picture or initial.) Or see a list of changes (and users) under Details > Latest Changes > Show All.
Click on a username to see that person’s profile information and contact options. You’ll also see any tree relationship found, as long as you’ve both opted to share that information. (See more on that below.) Click on the relationship to see the exact path. Use the Message box to contact them through FamilySearch; some users also share an email address.
Find more relatives on FamilySearch through “Relatives at RootsTech”. Each year, attendees (even those attending the free virtual event) can opt in to being connected to relatives and view your tree relationships. As in other Tree tools, information will not show for living people.
4. Connect Records to Non-Relatives
You don’t have to be related to someone to contribute to their FamilySearch page. That allows you to share otherwise-irrelevant materials from your collection with others.
“I often attach documents and information about non-relatives that I find,” says Tiffany Christler Wacaser of Putnam Valley, N.Y. “For example, in my research on New York colonial Palatines, I found several letters from a minister. When I looked up his profile on FamilySearch, there was nothing about his work. I added the letters and sources so relatives could read them.”
Others share similar stories of using the Tree to reconnect “orphaned” heirlooms, documents and photos with descendants:
- Anna Styles of Lakewood, Ohio, looks for old photos at flea markets with names on the back: “I take pictures of front and back with my phone. I then research the family and attach [the digital images] to FamilySearch.” I’ve done something similar with old photos, adding in the Collaborate section an offer to send the original to the first descendant who requests it.
- Joyce Chancellor of Gilbert, Ariz., was given a box of records for a woman who passed away in the 1980s. “She didn’t have any living family. I found people mentioned in her paper tree on FamilySearch, then attached the records I had for them,” she says.
- Terry Blair of Chagrin Falls, Ohio, has researched thousands of local burials in records that aren’t easily available to others: “I decided to begin putting not-yet-added information on the Tree for the benefit of others and so it will not be lost. As long as the site survives, the information will also survive.”
You’ll be most successful in these efforts when you have enough information about a person to identify them in existing person pages, or to create new person pages that have enough identifying information to be recognizable to others.
Let’s say you find antique photos marked with names, dates, relationships or location clues. (Learn more about identifying old photos here.) Use these clues to search for person pages or to create a new one. Include a note explaining why you’re connecting the item to that person page.
The back of this photo has a photographer’s mark for FW Toogood, Hartford, Mich., and a handwritten label: “Russell Crandall (Bertha’s son).” Additional research showed that Toogood was in business from 1900 to 1919. The FamilySearch Family Tree has a page for Charles Russell Crandall, with a 1900 census record identifying him as “Russell C Crandall,” age 5, listed just below his mother, Bertha. I added the photo to the Memories section, along with a note detailing where I’d found the photo and why I believed it to be this person.
5. See How You’re Related to Others
As a Tree user, you can activate tools that show how you’re related to both the living and the dead. But you need to 1) opt-in to the process and b) connect yourself to the Tree.
First, prepare your user profile to “meet” others. Click your profile icon in the top right corner, then click Settings. Under Profile, edit your name and contact ID for how you’d like others to see you. Consider adding a picture.
Under Notifications, turn on the option to receive messages; enable text alerts if you like. Under Permissions, turn on your profile information. Then, enable relationship viewing so you and other users can see how you’re related.
Next, add yourself to the Tree. Remember, you’re not creating a stand-alone family tree; you’re linking yourself to new or existing profiles of deceased relatives who are themselves linked to other relatives. Through this process, you’re creating connections to people throughout the world.
How to Add Yourself to the FamilySearch Family Tree
- Log in to your FamilySearch account.
- Under Family Tree, select Tree. You’ll be prompted step by step to enter information about yourself and your family. (You can also upload a GEDCOM file of your own family tree.)
- When you add a living relative, their pages remain accessible only to you. Adding a death date will make their page public.
- When you add a deceased relative, FamilySearch will suggest any existing person pages that may match. If an existing page matches your relative, add it. All linked data (including any other relatives attached to that page) will populate your Tree view.
- If you don’t find a matching person page, FamilySearch will create one. (It’s possible you’ll later discover another matching person page, at which point you can merge those pages.)
- Continue to enter your relatives on various branches of your tree until you link to existing ancestral pages that, hopefully, are themselves connected to others on the Tree. The more connection points you create on more family branches, the more possibilities for discovering relationships to others. Most connections to other users happen eight to twelve (or more) generations back.
Though FamilySearch is used by people around the world, North America and Western Europe are more documented than other global regions. Your experience in finding existing Tree pages for your relatives may differ from that of others, especially if you’re doing research in communities that are under-represented in the Tree.
Once you’re connected, you can start exploring family relationships.
- Under Activities > Famous Relatives, click on profiles of celebrities to see if a tree relationship is found. Just remember to verify any tree connections you want to brag about!
- On any deceased person’s page, click the View Relationship icon. If it doesn’t appear, no relationship has been found.
- When clicking on a user’s profile, look for a tree relationship.
With these new ideas for using FamilySearch’s Tree, you may start looking at your research a little differently. Now you know where to share those research discoveries you’ve never bothered to digitize, or that packet of letters you found at an estate sale. And you have another way to look for relatives—and an easy-to-use place to share favorite memories and mementoes for future generations.
Start exploring the Tree: Out of 1.5 billion people, odds are good that some of them are yours.
Related Reads
A version of this article appeared in the Jul/Aug 2023 issue of Family Tree Magazine. Last updated: March 2025


