Sign up for the Family Tree Newsletter! Plus, you’ll receive our 10 Essential Genealogy Research Forms PDF as a special thank you.
Get Your Free Genealogy Forms
"*" indicates required fields

From shows on the DIY Network to crafty pins on Pinterest, the do-it-yourself culture is thriving. With a little inspiration, determination and instruction, you can DIY a garden walkway, a feature wall out of old wooden pallets or a no-sew shopping tote from an old t-shirt. “But what I really want to DIY,” we can hear you thinking, “is my family history book.” Well, guess what? You can DIY that, too.
You may have thought an actual print book in which your relatives can read your family’s story and see photos would be out of reach. But with modern printers, desktop publishing software, online book services and entire self-publishing companies, the dream many family historians share—to see their genealogy work in print—is achievable.
And just like a home improvement project, you can DIY it all, or you can focus on the parts of family history publishing you feel comfortable with (say, the writing) and outsource the rest. Whether your needs and budget call for a simple bound collection of written family memories, a narrated photo book or an heirloom-quality hardback, this DIY guide will see you through the process.
ADVERTISEMENT


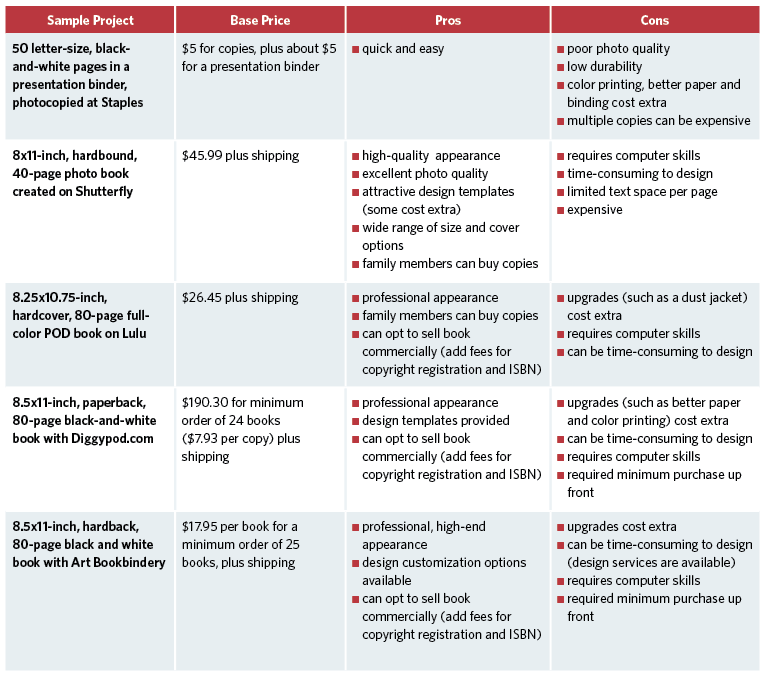
DIY Publishing Options
The technological advances that let you find digitized records and track your family tree online have opened up new options for self-publishing your family’s story. The processes and end products vary for each of the following options and, as you might expect, so does the cost:
Photocopied booklet
Using a word processing program, you can pull together a narrative family history, drop in images and a family tree generated from your genealogy software, and add footnotes or end notes. Print it on your color printer, staple it or put it into a presentation binder, and call it a day.
If you want multiple copies, email the file to your local copy shop or take it in on a flash drive, which will result in better images than photocopying your printouts. A copy shop also can provide card stock for a cover and even bind your book with saddle stitching (pages are stapled down the middle and folded), a spiral (like a notebook) or a perfect binding (resembles a paperback book) with a printed spine.
ADVERTISEMENT
The more you spend on binding, the more durable your book will be. Wire spirals damage the pages each time someone turns them. A relatively short-lived booklet might be fine for your purposes, but be prepared to spend more on a sturdier binding if you want the book to last for a while.
Going to a copy shop is simple and quick, but it may not be the most cost-effective option. Black and white copies generally start around 10 cents each, but the charges quickly add up for color printing, better-quality paper, two-sided pages and binding. You’ll usually get discounts for multiple copies of the same booklet. Get quotes from several shops—prices can vary greatly.
Photo book
Do you want to recount your family history in something more like a traditional book? A photo-book service offers a customizable layout, high-quality paper, attractive templates in a range of colors and themes, and a gorgeous cover. You start by picking a template, which comes with a selection of backgrounds and page layouts; then upload photos as JPG files; and add narrative (it’s a good idea to finalize the text in a word processing document before starting your book).

Because text boxes may be limited in size, this option is ideal when you want to let photos and document images tell the story, helped along with explanatory captions. Prices depend on the service and the size of book you choose. For example, on Shutterfly, hardcover books range from 8×8 to 11×14 inches. Prices are based on the first 20 pages, with a per-page cost for a longer book. The expense is a downside to this option, though frequent sales (especially around holidays) help mitigate the cost.
These services save your book once you create it, so you can purchase a copy and let family members order their own. Another downside is the lack of templates for genealogy-friendly design elements such as timelines and family tree charts. You could use your software to generate a tree, convert it to a JPG file and add it to the book as you would a photo.
Print-on-demand (POD)
Never before have so many aspiring authors in all fields of study published their work. POD self-publishing sites like Lulu and Blurb let you create a book on your computer and upload it as a PDF file for printing. You set the sale price and order copies as needed, or send a link to cousins so they can purchase their own copies. The POD printer gets a percentage of your sales. You even can sell your book commercially. In that case, the book will be available through Amazon, which also gets a cut.
You’ll need to format your book in a document according to the POD site’s specifications for file type, image resolution, margin size, etc., and create a cover. Most sites provide helpful instructions and templates, and some will do this work for you for a fee. You may be able to add on services such as obtaining an ISBN, necessary if you want to sell your book commercially. Blurb offers online software you can use to create your book, though it has a steep learning curve, says Nancy Barnes, owner of author services company Stories To Tell Books.
She recommends this option for skilled computer users. The cost of actually printing the book varies based on size, style, cover type, bindings and paper. You also may be able to choose an e-book. Your sale price should account for the site’s percentage and any profit you want. Find Lulu’s pricing calculator and Blurb’s pricing calculator. POD costs more than working directly with a printer (our next option) that offers volume discounts, but POD means you don’t have to buy a lot of books up front that may end up collecting dust in your attic.
Publisher-for-hire
When you work directly with a book printer, whether online or in your local area, there’s no continuing arrangement between you and the printer, as with POD. Instead, you supply the files for your book, order a minimum number of copies, and the print service prints them. Ask about volume discounts, though you may need to buy 100 or more books for a significant price break.
If you have a large family and everyone wants a copy, working with a printer may be your most cost-effective option. Printers require you to submit fully prepared files, usually PDFs, that meet their specifications. You may need to submit image files separately as well as embedded into your PDFs.
Most publishers offer more personalized guidance and add-on services than a POD site would. Independent publishers such as Genealogy House can help with writing, editing, graphic design and other aspects of the publishing process—great if you have a long, complex book combining text and images. These are best laid out with graphic design software such as Adobe InDesign. Especially if you plan to sell your book, you should seriously consider professional editing and design services.
eBook
Digital books are increasingly popular choices for self-publishing. A wide range of file formats are proprietary to different e-reader devices, such as Kindle and Nook, but if you stick to a simple PDF, people can read your book on a desktop computer or on any device that will open a PDF. And it’s easy to create your book in a Word document and save it as PDF. Try to see how your book looks on popular devices. You may need to tweak the layout to make sure page breaks and pictures fall in the right places.
The big benefit to an ebook is avoiding the costs and decision-making of printing, but remember that not all of your intended audience uses e-readers. Many won’t place the same value on a PDF file as on a printed book. The longevity of ebook files will likely change as technology develops, but that printed book on your shelf will be able to be held by your descendant’s generations from now. If you’re trying to produce a family history that stands the test of time, print your book. Or offer the best of both: If you use Lulu or Blurb, relatives can choose to order a print book or an ebook.
Assembling Your Book
Go ahead and start writing, but when you set up your book file with images and footnotes, you’ll want to have a plan for the self-publishing option you’ll use, the type of binding, the size of your book, etc. “Many people ask if there’s a template for such a book,” Barnes says. “But each family history is so unique and the information takes different shapes and uses a different organizational plan.”
Start by browsing the family history section at a genealogical library and noting what you do and don’t like about those books. At genealogical society meetings and on Facebook, talk to fellow researchers who’ve undertaken such projects. And ask yourself these questions:
- What’s your budget for this endeavor? Will family members be interested enough to purchase copies?
- What type of end product do you want? A hardback, full-color, high-end book? A paperback novel? Or will black-and-white photocopies do?
- How much time can you spend on it?
- How comfortable are you with word processing and desktop publishing software?
- Who’s your intended audience?
- How long will your book be?
- Do you have a lot of photos and/or record images you want to include?
- How many copies of the book will you need?
- Do you intend to sell the book for profit, give copies as gifts, or make it available for purchase only to relatives?
Once you have a clear vision for your family history book project, think about these important elements:
Writing the Story
The length and type of your book goes hand in hand with the option you choose. Writers think in terms of word count. Use the word count feature in your word processing software to find out how many words your manuscript holds. The 6×9-inch book you’re envisioning typically has 300 words per page, so your 24,000-word manuscript will need 80 pages, plus more for photos. A photo book with captions requires fewer words than a full-length narrative.
You’ll want to have a fresh eye on your book before you submit it for printing. A friend who’s good with grammar will do for a book that’s just for family, but hire a professional editor if you want to sell your book. Even the most seasoned authors utilize copy editors to proofread their work and double-check grammar and spelling. Making sure your text is in its final form also will save you money: You pay for every change you make after submitting your book to the printer.
It’s also important to include the sources of your family history information. That’s where it helps to cite sources all along—you won’t have to try to figure out where you found that census record five years ago. Whether to include formal citations or to simply provide source information is up to you and will depend on your intended audience. You can include citations/source information in numbered footnotes (at the bottom of the page) or end notes (at the end of the book).
Selecting the Images
If you have a lot of photos and record images to include, you’ll want a book with high-quality paper and color printing so the images will reproduce well. As you write your draft, note in your document which images you plan to use. Make sure you have permission to use the pictures in a published work. If they’re from your family collection, you probably do, unless a professional photographer took the photo after 1922. Otherwise, you’ll need to obtain permission from the copyright holder or the owner of the image, or figure out whether it’s in the public domain (this chart can help). That could take some time, so weigh how important each photo is to your project. Image quality is important: If photo resolution is too low, the image will look pixelated in print. Barnes recommends using high-resolution files (usually JPG or TIFF), of at least 300 dpi (dots per inch) or 1000×1000 pixels.
Tip: Not enough ancestor photos for your book? You can illustrate your family’s story with maps, record images, historical photos of ancestral communities, and pictures of gravestones, heirlooms and family homes.

Choosing the Cover
An attractive cover will entice generations of your family to open the book. A simple cover with an ancestor portrait and a title is best. If your book will be just for family, you can use a site such as Canva, which offers design templates you can use, or ask your graphic design student niece. If you plan to sell your book or you just want a polished look, consider hiring a graphic designer for the book cover and interior. It’ll be worth the extra expense.
Preserve and Project Your Project
Any written work is copyrighted whether or not it bears a copyright statement, but you can remind others it’s copyrighted and identify yourself as the copyright holder with a statement on the back of your title page. For example, “Copyright 2015 Joe Smith. Not to be reprinted without permission.” You also might include your contact information in case someone wants to reuse a part of your work.
Registering your self-published book with the US Copyright Office creates a public record of your authorship, a big benefit if you have to pursue a copyright infringement in court. The simple process involves filling out a form and paying a fee. You’ll receive a certificate legally declaring you the copyright holder for your work.
If you’re writing a book you plan to sell, you’ll want an ISBN (International Standard Book Number), a unique commercial identifier. Your publisher or POD service can supply one, although this locks you into keeping your book with that company. And when you purchase your own ISBN for about $125 through an agency called Bowker, you can come up with your own publishing company name.
Once you have an ISBN, you’ll need yet another number, an LCCN (Library of Congress Control Number), if you want to add your book to the Library of Congress. A POD publisher can’t do this for you. Learn more about the process here. There’s no fee, but you must order the LCCN before your book is published, and once it’s published, you have to send a copy to the Library of Congress. The ISBN and LCCN must appear on your book’s copyright page. In the end, you’ll be proud that you took steps to preserve and present your family history.
Related Reads


A version of this article appeared in the September 2015 issue of Family Tree Magazine.
ADVERTISEMENT