Sign up for the Family Tree Newsletter Plus, you’ll receive our 10 Essential Genealogy Research Forms PDF as a special thank you!
Get Your Free Genealogy Forms
"*" indicates required fields
Judge Ed Lane of Washington County, Ohio, realized something needed to be done about the treasures in his courthouse attic. “We are home to Marietta, the first organized settlement outside the original 13 colonies,” he says proudly. “Our records pre-date the Northwest Territory.”
Among Washington County’s old records are marriages performed by George Washington (yes, that George Washington) and land grants he dispensed to fellow generals. Lane, now retired, recalls that the county even had an original draft of the Northwest Land Ordinance, but it’s disappeared. “There’s a lot of history here,” he says. “It’s literally being lost, and we wanted to preserve it.”
He credits his former secretary, a genealogy researcher and registrar for the Daughters of the American Revolution, with the idea of contacting FamilySearch. FamilySearch hosts the largest free genealogy website in the world, and includes record preservation in its nonprofit mission.
According to Lane, FamilySearch was impressed with their collection—so impressed, in fact, that it sent a volunteer team to organize, preserve, digitize and publish Washington County’s court records dating to 1783 .
FamilySearch teams are doing the same for communities all over the world: rescuing genealogical records from obscurity and deterioration. Currently, more than 300 crews are on the ground in nearly dozens of countries. They capture millions of images worldwide per year, many of which get published on FamilySearch.
It’s a mind-boggling and exciting initiative, overseen by experts and carried out by thousands of volunteers. And for genealogists, the upside is enormous: free access to billions of historical record images. The ways you can help this effort (even in seemingly small ways) are gratifying, too.
Here’s how FamilySearch’s record-saving process unfolds, and how the site selects records, creates images of them, and adds them to its digital archives.
1. Identify the Records
Washington County’s request for help reached the Content Strategy team at FamilySearch headquarters in Salt Lake City, Utah. This group consists of a dozen genealogists who visit archives of all kinds in about 20 countries per year.
According to David Ouimette, who leads the Content Strategy group, “We discuss record holdings, review their records inventories, tour the stacks of manuscript materials, and evaluate the documents for their genealogical content.”
After identifying which records may be available for digitization, the team prioritizes them in terms of which will help the most people find their ancestors. Sometimes they need to give immediate attention to deteriorating records, or they give precedence to records that provide genealogical data not widely available. A convenience factor may also come into play if a camera team can image large quantities of documents in one location.
The Content Strategy team categorizes records into three tiers in descending urgency:
- Tier 1: Records that have names, dates, places and family relationships and are of highest genealogical value (e.g., vital records, censuses and civil registrations)
- Tier 2: Records that have at least some of that data (e.g., probate, military, immigration and naturalization records)
- Tier 3: Records have less standalone value but are of more use when combined with other records (e.g., tax, land and some court records)
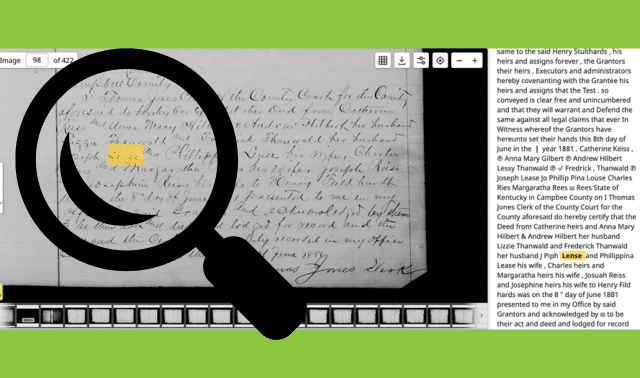
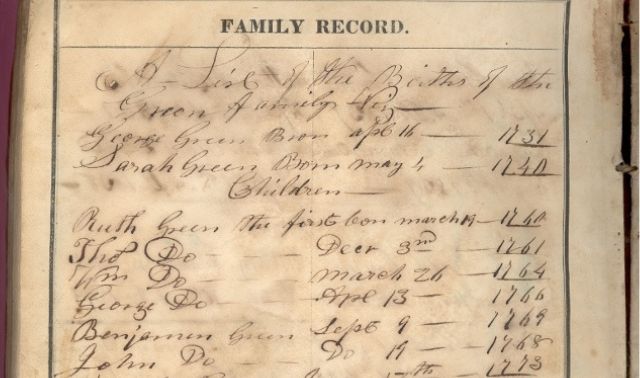
The records from Washington County, Ohio, were some of the earliest known for the region and included vital events, plus documents from various courts, including naturalization records.
2. Create a Plan
Washington County’s top priority was to preserve priceless original records by creating master digital copies: a common concern for archivists and historians. Fires, hurricanes, tornadoes, floods, insects, moisture, heat, human carelessness and neglect all threaten records. But even the best safeguards won’t protect against every threat, and not all facilities can afford them.
However, digital preservation is expensive and time-consuming. When FamilySearch takes on a project, it shoulders this cost—including future costs of maintaining the data. “Having someone hand you digital copies of your records is kind of like getting a free puppy,” says John de Jong, FamilySearch’s North America Multi-Area Manager in the Records Access Division. “It’s great at first, but then it gets expensive. Once you start down the digitization path, you can’t abandon it. You have to keep backing it up and upgrading the formats when they change.”


FamilySearch offers the equivalent of lifetime care for that free puppy. “Once the picture is taken, we store it in our vault,” says de Jong. “We keep multiple backup copies and keep up with changing formats. We are here for the long haul.”
Those backup copies have come in handy. For example, in 2014, an 1880s-era courthouse in Hancock County, Ga., succumbed to a devastating fire. Many of its records were destroyed. FamilySearch had previously microfilmed Hancock County land records, and supplied the county with freshly digitized copies from that collection.
In addition to preservation, FamilySearch prioritizes online access to the genealogical records in its care, offering free hosting and access. Some repositories are happy to consent because it saves them the cost and effort of providing this service to their patrons. Other record custodians may consent only to partial access (such as an index without images) or access that is restricted to use at a library or Family History Center.
All these details get negotiated and finalized by contract. That way, each party knows what to expect. Then it’s time to dig into the records themselves.
3. Prepare the Documents
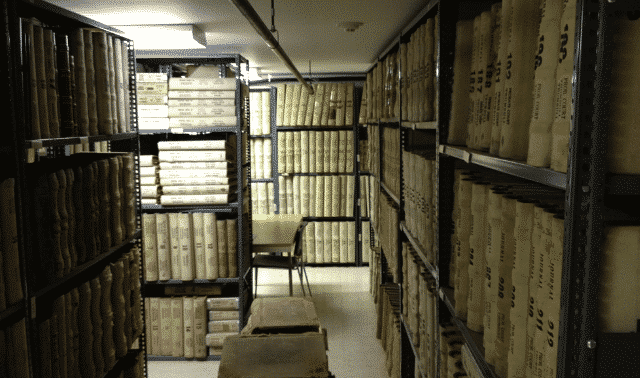
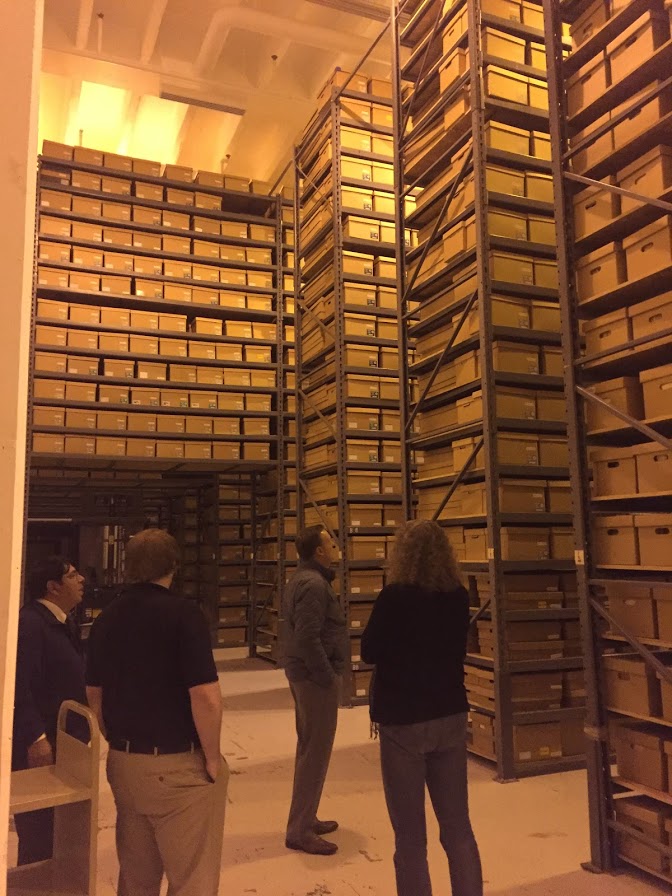
The Washington County imaging project couldn’t begin until the old records came out of storage. They filled shelves in four separate rooms and a hallway in the courthouse attic. The attic’s old service elevator had been dismantled years ago. Some of the shelves reached to the 20-foot ceilings, and there was no way to get a ladder up the attic stairs.
County commissioners hoisted a ladder up four stories and through an attic window. Then young volunteers from a local church group took the stairs to the attic, scaled the ladder and hauled the records downstairs. “They were covered in dirt and smiling ear-to-ear,” recalls Lane. “I bet those teenagers will remember that experience for the rest of their lives!”
Next, the records had to be opened and sorted—an enormous undertaking. Some documents were bound in heavy ledgers. Others were in boxes. Many were in folded packets or wrapped in paper and string.
A local couple, Dan and Carolyn Grammar, took charge. “They got every record out, cleaned them, organized them in acid-free boxes and put them in logical sequence,” Lane says. The process took about 18 months, even with the help of volunteers from the local genealogical society and elsewhere.
Washington County’s records were generally in good shape, but that’s not true of every preservation project. “We’ve had cases where local genealogical or historical society volunteers have pulled old records out of dumpsters,” says de Jong. “In one place, there was a flood. The books were all damaged and had to be flash-frozen. Then the mold had to be removed before we could take pictures.”
4. Take Pictures
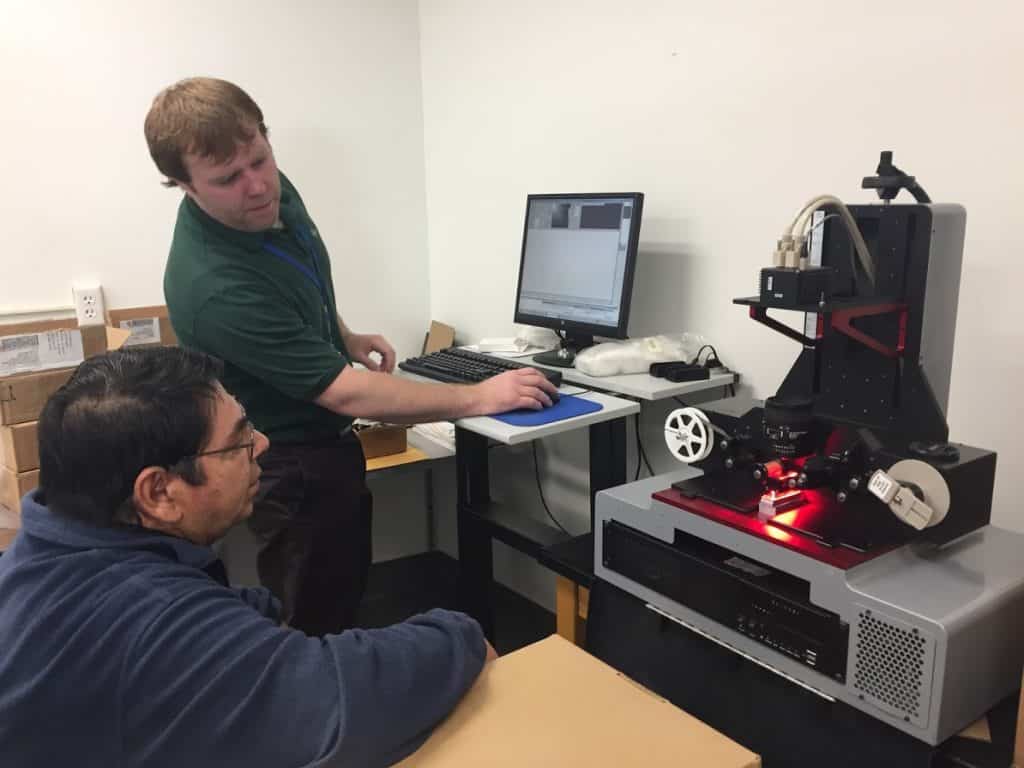
Once documents are prepped, it’s time to take pictures. “About 80% of FamilySearch cameras are run by FamilySearch missionary volunteers,” says de Jong. “We wouldn’t be able to accomplish this without them. It’s driven down the cost of this effort tremendously.”
De Jong calls them “missionaries” because these full-time volunteers, typically retired couples, sign up through FamilySearch’s sponsoring church, the Church of Jesus Christ of Latter-day Saints. Motivated by a religious belief in the importance of family ties, they commit for 12 to 24 months and often relocate at their own cost to assigned project sites.
The Grammars were FamilySearch missionaries, as were David and Karen Clements. The Clements underwent a short but intense training program on how to use the camera before moving from Mapleton, Utah, to Marietta and setting up shop at the courthouse.
Once operational, they covered their camera workstation with an aluminum-frame stand and surrounded it with fluorescent lighting. Over the course of the next several months, the Clements imaged over 90,000 original document pages.
“We have multiple types of cameras for different projects,” says de Jong, including top-of-the-line Illunis cameras and the more recently-introduced Nikon D810, with color capabilities. When scanning books, custom scanning software automatically divides the two-page spread into separate images, crops them and adds identifying information.
Other projects employ high-speed microfilm scanners, brought in when high-quality films of records already exist. For example, FamilySearch brought in a NextScan film scanner for a project in the Minnesota State Archives.
In another high-speed project, FamilySearch scanned almost 7 million images of Veterans Administration index cards. (These are now on the site.) “It would have taken 14 years to take pictures, but only took six weeks to scan them,” says de Jong. According to him, a microfilm scanner can records about 100,000 images each week.
5. Publish Images
Each year, FamilySearch publishes tens of millions of images that its crews have taken. Some are never slated for publication on FamilySearch due to archives’ wishes; in these cases, FamilySearch usually at least creates and hosts an index. Other images require additional time to prepare for publication.
According to de Jong, camera operators send weekly collections of images to Salt Lake City or an office in Germany on an external drive. Once at one of these FamilySearch facilities, the images pass through a quality check that assesses their legibility and blurriness. If they pass, the images are uploaded to the FamilySearch computer systems. If they fail, FamilySearch sends the images back to the camera operators for a do-over.
At this point, the images aren’t indexed yet, and may need some editing. But they are still organized enough to make them viewable page by page. (For example, all the probate record images for a single year may be grouped together.)
FamilySearch publishes the images online and links to them from that collection’s entry in the FamilySearch Catalog (a searchable version of the combined resources of FamilySearch and its bricks-and-mortars counterpart, the Family History Library in Salt Lake City).
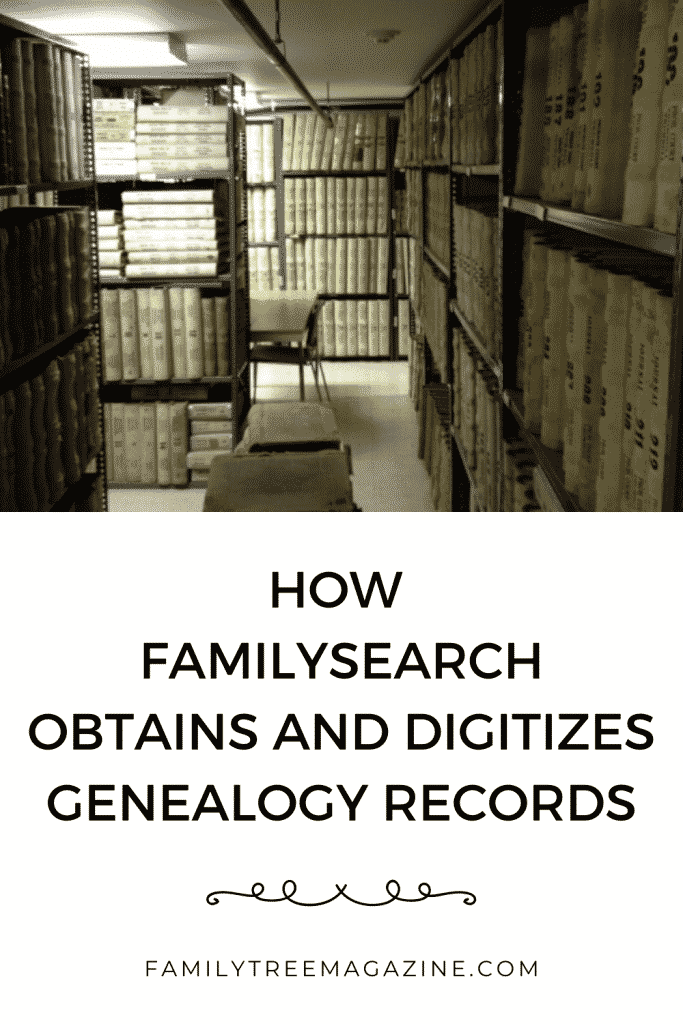
After a collection of record images is fully edited and sometimes indexed, it eventually lands in a different part of the site: the Historical Record Collections. You can find upwards of 1.4 billion record images here.
Some images require you to page through the images yourself to find your ancestors’ names; these have a Browse Images link in the Records column. But if the collection is at least partly searchable by name, you’ll see a number in the Records column. (Click on the record collection to search it.)
FamilySearch continues to quicken its digitization process. In early 2020, the site announced users would now be able to view record images just 24 hours after their digitization. Browse these new record images (as well as FamilySearch’s archive) by location. You can also check for images at both the FamilySearch Catalog and in the Historical Record Collections list.
6. Index the Records
The final step in making the world’s historical records accessible to all is indexing them, or extracting names to make them searchable. FamilySearch runs an online indexing portal that engages tens of thousands of volunteers from around the world. These volunteers index more than a million names per day from the comfort of their own computer workstations.
“The efforts of the volunteers who are assisting are monumental and incalculable,” De Jong says. “However, at this rate, it will take us more than 200 years to finish indexing just what’s in our vault right now—not counting the 150 million images we’re taking each year.”
The “vault” he’s speaking of is the Family History Library’s enormous collection of microfilmed records, which is also quickly being digitized and published via the same two-step process described earlier.
It’s stunning to think that current, heroic indexing efforts are barely putting a dent in the growing stockpile of record images. But here’s a case in point: As of writing, the Washington County court records—published online in 2016—still aren’t indexed.
FamilySearch works constantly on ways to make indexing faster and more efficient without compromising accuracy. Experts have automated indexing for some printed records and have been working for years on technologies that allow computers to recognize handwritten records, too. In addition, de Jong says volunteers can now work within browsers, rather than having to download a cloud-based program.
Of all the steps in the FamilySearch digitizing process, indexing is the easiest for anyone to help with. To give it a try, go to FamilySearch.org, create a free login (if you don’t already have one) and click the Indexing tab. Browse a world map or list to select a project that fits your interests and language skills.
FamilySearch also loves it when volunteers index records from their own locales, since locals are most familiar with place names, common surnames and the like. If you’re ready for a learning opportunity, try indexing a record type with which you’d like to become more familiar.
Looking ahead, FamilySearch has been working on a tool that will even let you create your own indexing project from among their millions of published record images. (Watch for updates on this tool in future issues.)
On the list of records I would help index: those early Washington County, Ohio court records. My sixth-great-grandfather Thaddeus Pond moved there in 1801, and I’d love to learn more about his life in the Old Northwest Territory.
A version of this article appeared in the May/June 2020 issue of Family Tree Magazine.

ADVERTISEMENT