Sign up for the Family Tree Newsletter! Plus, you’ll receive our 10 Essential Genealogy Research Forms PDF as a special thank you.
Get Your Free Genealogy Forms
"*" indicates required fields
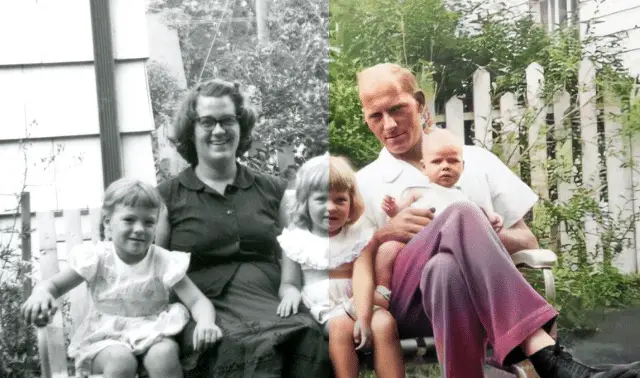
Can you save and even repair your old, worn out family photos? Absolutely! You don’t need a bunch of expensive editing tools to make serious improvements. There are plenty of accessible online tools that, combined with a little bit of know-how and some time, will help you turn those faded prints into vibrant views of your family’s history. Read below for some tips that will help you edit and digitize old photos with ease.
1. Scan Old Photos with Your Camera
Maybe your aunt pulled out her photo albums and you have only a few minutes to get those photos into digital form. That’s not a problem if you have a smartphone. If you don’t have access to a scanner, you can still digitize old photos by using your camera’s phone to snap a photo. Today’s cell phone cameras have great resolution and continue to get better, so you can get a decent image to work with.
From your camera, it’s easy to send the images right to Evernote, a Google File, Dropbox, or some other form of storage until you can get to your computer to work with them.Try to fill the camera frame with the image and take the photo on a flat surface near a natural light source. If it won’t cause any damage, remove it from any frames or albums to cut down on glare.
2. Boost Faded Images
Photos fade over time, especially if they’ve been exposed to sunlight or other bright lights. However, you can give your image a quick boost with a filter. Your results are limited by your phone’s options, but there are some excellent apps that offer a wider selection of preset filters. Check out VSCO, PicMonkey or Vivid-Pix for some easy-to-use options that yield professional-looking results. Manually boosting, on the other hand, gives you more control. Thankfully, apps like Pixlr or Fotor make the process easier.
3. Correct the Color
The quality of color in old photos can vary widely and distort over time as certain inks fade. If you’re reasonably sure your ancestors weren’t bathed in a weird yellow light, and the trees in the background were green rather than blue, try fixing the color using your photo editor’s automatic color correction. If that isn’t enough, try using the Light, Saturation and Temperature, Light and Shadow tools to adjust the color.
4. Heal Photo Damage
Water spots, tears, bends and tears can wreak havoc on your favorite pictures. While the damage can tell a story in and of itself, you can digitally repair the damage done to the original paper copy. Use retouch tools well by zooming in on the area you want to fix and choosing the appropriate brush size in your application. More importantly, take your time and work slowly. Janet Havorka offers some advice on working with editing tools in this article.
5. Don’t Go Overboard
It’s tempting to get a little too enthusiastic with the retouching and color tools. Next thing you know, you have an oversaturated photo with weird splotches replacing your ancestor’s nose. Don’t work on your original; making copies is as easy as choosing Save As and another name. Take your time! Retouching and photo editing take a lot of practice and patience in equal measure.

Related Reads