Sign up for the Family Tree Newsletter Plus, you’ll receive our 10 Essential Genealogy Research Forms PDF as a special thank you!
Get Your Free Genealogy Forms
"*" indicates required fields
Genealogists like to maximize their research time. With so many productivity tools and apps available for note taking, to-do-lists and project management, it can be a challenge to find the perfect one to organize search results, DNA data and family stories. Part database, note taker and virtual white board, Notion (founded by Notion Labs in 2016) is a free “all-in-one workspace” that does all that and more. Follow our three Cs to set your family history workflow in Notion.
1. Create Your Notion Account
Set up a free account at https://www.notion.so by entering your email address. On the next screen, you can choose to use either Notion “For myself” (free for one person) or “With my Team” (start for free). Make your selection and click continue. Notion has two paid plans: the Personal Pro at $4 per month/billed annually or $5/monthly and the Team Plan at $8 annually or $10/monthly. However, the free personal plan should be sufficient for most genealogy-related tasks.
Notion can feel overwhelming at first. Fortunately, after you create your account, you will see a default page with the Getting Started tutorial, which you can use to walk through Notion’s key features.
ADVERTISEMENT
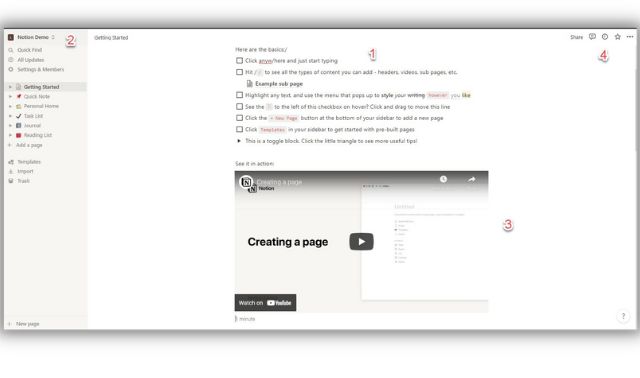
For example, the default page instructs you to “click anywhere to just start typing” and provides instructional steps like clicking the / (slash) key on your keyboard to bring up a menu for adding sub pages, headers, checklists and more. Hover over the gray-colored block to access the drag-and-drop feature for moving pages between workspaces or to move items in your list view. Click the block to open a menu with more features. The final item is a toggle block symbolized by a little triangle that shows a link for the Template Gallery from the Notion community and Help & Support Guides. For using Notion on mobile devices, visit the Notion for Mobile page.
All pages in your Notion workspace live in the left sidebar. At the top right, you will see the Share, Comment, Updates and Star (Pin) icon. Click on the three dots (Ellipsis) to the right of the icons to reveal styles, export features and other functions. In the main area, you will see a blank canvas where you can create your pages. Learn the keyboard shortcuts for Mac or Windows to save time.
2. Customize Your Workspace
Once you have your account set up, customize your Notion workspace by creating your own pages. To do this, click the + New Page on the bottom left of the screen. You can use the default page Notion provides or Click “Templates” either on the new page or in the sidebar to bring up a list of options. The Personal account comes with several default templates listed in the sidebar (Quick Note, Personal Home, Task List, Journal and Reading List).
ADVERTISEMENT

When you click on one, three dots appear. Then you can duplicate, rename, move and even delete the template if you don’t need that page type. To add a new page, click the “Add a page” or “+New page” and then either customize your new page or click “Templates” in the center of the Untitled page box that pops up or in the sidebar. Knowing the keyboard shortcuts for Mac or Windows can also come in handy here.
It is worth browsing the many templates available to see if there is one that matches your needs. For example, if you plan to use Notion primarily for notetaking while searching in online databases, or during genealogy research trips, go to the Template gallery and browse the templates in the Reading & Writing category. For research logs or plans, check out the “Planning” category. Once you customize your page, you can set up multiple ways to view it depending on whether you prefer a list, a table or a Kanban-style board, which organizes your information into a series of lists and cards. Learn more about setting up views by reading Notion’s Views, Filters and Sorts page.
Want to collect information from your favorite genealogy blog or reference site? Installing the Notion Web clipper either for the Desktop or as browser extensions for Chrome, Firefox or Safari lets you save any web page to your workspace so you can read or edit it later.
If you’re using Notion as a place to hold all of your ideas, things can start to get cluttered pretty quickly. Learn how to streamline your sidebar and organize your workspace with Quick Notes.
For help with any Notion features, click the question mark on the bottom right of the screen to call up the Notion Help page.
3. Collaborate With Family and Colleagues
While the more robust Team account provides for unlimited members, a collaborative workspace and more control over who can share what, the nice thing about Notion is that you can still share privately by inviting up to five guests (such as family or colleagues) to individual pages. To invite someone, click the Share menu at the top right of your page. Add an email and use the dropdown menu to set level of access, then click Invite to add people inside your workspace or outside as guests. Use the Copy link to copy the page’s unique URL to your clipboard so you can share it with whoever you want. Turn on Share to Web if you wish to publicly share the page.
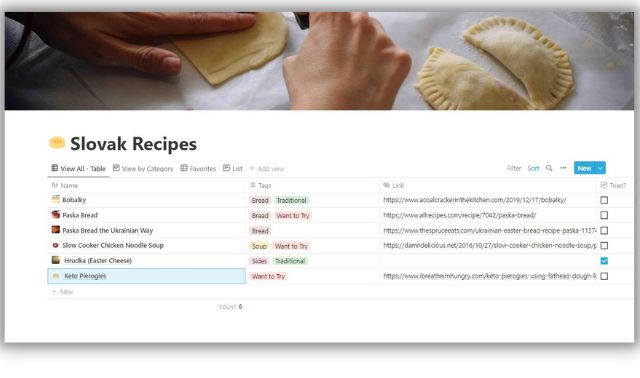
One way I have used Notion is to create a database of comprised my some of my favorite family recipes for Slovak dishes and desserts that I included in my book Baba’s Kitchen: Slovak & Rusyn Family Recipes & Traditions, as well as others I found online.
Feeling creative? Develop your own Notion templates to share with family members or fellow researchers. For directions and inspiration, see Notion’s page for instructions on how to submit a template.
Notion, Evernote and Trello: Compared
Family history enthusiasts who use other popular organizational tools such as Evernote or Trello may wonder how Notion stacks up when it comes to tackling genealogy-specific tasks. The answer is that it depends on how you intend to use it. Trello is more of a project management/to-do list tool, while Evernote is known for its notebook style organizational structure.
Additionally, Trello is set up Kanban-style only and offers no option to change its view. Instead of a single list-style, the functionality of Trello allows you to drag and drop cards to different lists rather than just adding check marks for completed tasks. The “Butler” feature makes it easy to automate recurring tasks (such as adding or removing card labels and archiving cards). That said, to add extra functionality, you will need to add “PowerUps” to link to programs such as Calendar, Google Drive and even Evernote. A free Trello account also includes only 10 boards and 10MB/file storage. As a note-taking focused app, Evernote allows you to create lists and tables to add images and even audio and video (you will need more than the free plan to make sure you have enough storage space for media files).
Notion applies elements of each program but in a more visually basic way. In addition, Notion lets you directly import various file types including Plaintext (.txt), Microsoft Word (.doc) CSV (.csv), and HTML (.html). At the time of this writing, Notion was offering a $5 credit to import data from Evernote, and you can import from Trello and other apps. I successfully imported one of my Research Task boards from Trello into Notion.
After the import, Notion retained the Kanban-style appearance of my lists and the images and notes I had on the cards, but I did have to clean up some of the data to improve the appearance. There are other limitations (for example, PDF or other file attachments in Evernote typically will not transfer), and formatting issues are likely to occur. This may require you to make some edits once you get the information into Notion.
Some may find the Notion user interface quite basic compared to the other two programs and notice a steeper learning curve to master the shortcuts. However, if genealogy productivity is your goal, the cross-platform/device capability, flexible page views and generous free plan offer are good incentives to give it at least a trial run.
Tips for Using Notion for Family History
- Research Plan or Log. Customize Notion’s Lightweight To-Dos template with a To-Do, Doing, Done format into a genealogy research plan. Just click the Duplicate template button and add items such as databases to search, records you need to order or cousins to contact. For those who like to use a Bullet Journal, Notion has
- Resources Checklist. Adapt the Task List template that appears by default in the Notion workspace or the Task Manager Template from the Template Gallery to create a list of genealogy resources (vital, census, immigration, etc.) you need to research an ancestor.
- Family Recipe Database. Tweak the Notion Recipe Box template to catalog Grandma’s Apple Strudel recipe or search online for an ethnic recipe you’d like to try. Each entry in this template has a link to the original recipe or link posting and a “Shopping List” and more. Add labels such as “want to try” and icons or representative images for visual notes. Toggle views allow you to sort the recipes “By Category” and “Favorites.” You can use your database to build a digital cookbook.
- Blogging. Build your blog in Notion, using the free Blog Post template and then easily share with the public setting. You can also create a blog homepage to link out to all your posts. Showcase your favorite ancestral photos with the gallery view. The Blogging Manager template will help you with planning your posts.
- Storyboards. A storyboard is a visual outline, and you can use Notion to create one for your family history, adding key points, ideas, chapters and scenes. See Mel Lee-Smith’s guide for some inspiration on how to create a Writing Dashboard in Notion.
- Heritage Travel Planner. Looking to make a trip to your ancestral homeland or to the Family History Library in Salt Lake City? Go to the Personal Home Category in your Notion sidebar and adapt the Travel Plans template. You can go to the Travel Planning template page to duplicate and edit to track flights, expenses and more.
- Book/Resource Library. Notion’s Research List template provides a dashboard to help you track all the articles, videos, podcasts, blog posts, books or social media. Or try the book tracker to track genealogy books you have read or would like to read.
- Portfolio Planner. Becoming a Certified Genealogist is a rewarding, year-long process. The Board of Certified Genealogists grants genealogy certifications to candidates who prove themselves to be capable, thorough researchers. If you are on track to become a Certified Genealogist and need help organizing your busy schedule, the Weekly Agenda is a good place to start. Also use the default Weekly Planner that appears when you create a new Notion page.
- DNA Results Database.
- Disaster Planning. Be prepared when disaster strikes. Use the Disaster Prep Plan on Notion to gather supplies and make a plan to protect your precious family heirlooms and personal documents.
- Genealogy Budget. Use Notion’s free Budget Tracker Template to track family history related spending for genealogy conferences, records, books and more, or the Subscription Tracker to manage all your genealogy website subscriptions and renewal dates in one place.
- Conference Notes. Use the Notion Toolkit
- New to Notion
- Notion 101
- Notion Apps
- Notion for Genealogists Facebook Group
- Notion Help/Reference
- Notion Import
- Notion Keyboard Shortcuts
- Notion Meet Your Workspace
- Notion Pricing
- Notion Sharing & Collaborations
- Notion Template Gallery
- Notion Write, Edit & Customize
- Notion YouTube Channel
Related Reads
 Plan your family history research, track ancestor searches, and log your genealogy finds with the free Trello app. Here’s how to use it.
Here are four ways you can use Evernote to preserve your own family history.
Evernote’s logo is an elephant—because it never forgets. Learn the best ways to organize research notes and files in Evernote with these six steps.
Plan your family history research, track ancestor searches, and log your genealogy finds with the free Trello app. Here’s how to use it.
Here are four ways you can use Evernote to preserve your own family history.
Evernote’s logo is an elephant—because it never forgets. Learn the best ways to organize research notes and files in Evernote with these six steps.Last updated, June 2022.
ADVERTISEMENT